Blogs

6 Best Calisthenics Arm Exercises To Have Chiseled Arms

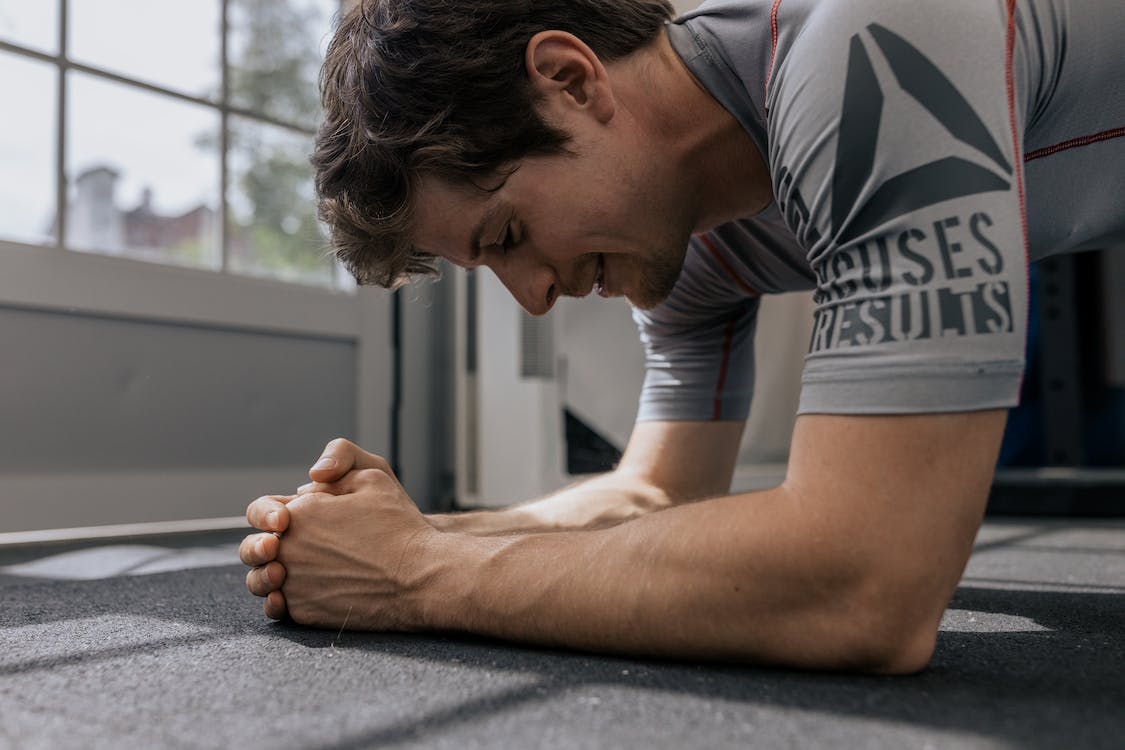
When it comes to building strong and defined arms, calisthenics provides an excellent foundation. These bodyweight exercises target the major muscle groups in your arms and engage various supporting muscles to enhance overall upper body strength. This blog post will discuss the top six calisthenics arm exercises, explaining how to perform each exercise correctly, the benefits they offer, and the common mistakes to avoid. Whether you’re a beginner or an experienced fitness enthusiast, incorporating these exercises into your routine will help you achieve impressive arm strength and aesthetics. So, let’s get going and discover the power of calisthenics for your arms: Related Blogs: Calisthenics Leg Exercises Calisthenics Shoulder Exercises Calisthenics Arm Workout No Equipment Don’t you have any equipment, still you want to develop heavy arms? No worries, and let’s do it with calisthenics no equipment arm exercises: 1.     Diamond Push-Up Image Source How To Do It? Start in a high plank position with your hands close together, forming a diamond shape with your thumbs and index fingers, directly below your chest. Extend your legs straight out behind you, balancing on your toes, and engage your core muscles to maintain a straight line from your head to your heels. Lower your body towards the ground by bending your elbows, keeping them close to your sides, and maintaining the diamond shape with your hands. Continue lowering until your chest or chin lightly touches the diamond shape created by your hands. Push yourself back up to the starting position by fully extending your arms, while maintaining control and tension in your muscles. Benefits Diamond push-ups work the triceps brachii muscles, making them an excellent workout for increasing arm strength and definition. They also work the pectoralis major, deltoids, and core muscles, increasing upper body strength. Mistakes To Avoid Avoid allowing your lower back to sag or your hips to hike up during the movement. Maintain a straight line from your head to your heels throughout this calisthenics no equipment arm workout. Also, ensure your elbows are tracking along your body rather than flaring out to the sides. 2.     Chin-Up Image Source How To Do It? Find a sturdy pull-up bar and grip it with an underhand grip (palms facing towards you), hands slightly wider than shoulder-width apart. Hang from the bar with your arms fully extended, engaging your shoulder blades by pulling them down and back. Begin the movement by bending your elbows and driving them down towards your hips, pulling your body up towards the bar. Continue pulling until your chin is above the bar, focusing on squeezing your shoulder blades together and maintaining tension in your back muscles. Slowly lower yourself back down to the starting position, fully extending your arms. Benefits Chin-ups are a complex calisthenics arm exercise that mainly works the latissimus dorsi and biceps brachii muscles on the front of the arms. They also give the upper body a complete exercise by working the forearm, shoulder, and core muscles. Mistakes To Avoid Avoid using excessive swinging or momentum to complete the movement. Focus on controlled and deliberate contractions of the target muscles throughout the exercise. Also, be mindful of not shrugging your shoulders up towards your ears, and maintain a straight body position without excessive arching or swinging. 3.     Bear Crawl Image Source How To Do It? Start on your hands and knees, with your hands directly under your shoulders and your knees under your hips. Lift your knees a few inches off the ground, slightly bending your hips and knees. Crawl forward by moving your opposite hand and foot simultaneously, maintaining a stable core and a steady rhythm. Continue alternating your opposite hand and foot, moving forward for a desired distance or time. Benefits Bear crawls engage multiple muscles in the arms, shoulders, and core. They improve overall arm strength, endurance, and stability. Additionally, bear crawls are amongst the top calisthenics arm workouts for intermediates and advanced help to enhance coordination and promote full-body engagement. Mistakes To Avoid Avoid allowing your back to sag or your hips to rise too high during the crawl. Maintain a strong and stable core throughout the movement. Remember to keep your hands under your shoulders and maintain a controlled pace. Top Calisthenics Arm Exercises Let’s have a look at some great calisthenics arm workouts that are sure to up your arm game: 4.     Overhead Triceps Extensions Image Source How To Do It? Stand or sit upright with a dumbbell or any weighted object in one or both hands, depending on your preference and available equipment. Raise the weight(s) overhead, extending your arms fully. Keep your upper arms close to your head and perpendicular to the floor. Bend your elbows, slowly lowering the weight(s) behind your head. Pause briefly when your forearms are parallel to the ground. Extend your arms back to the starting position by straightening your elbows. Benefits Triceps brachii are the primary muscle group worked in overhead triceps extensions, and they are responsible for increasing upper-arm strength and size. During the workout, they also activate the shoulders and core for stability. Mistakes To Avoid Avoid arching your back or leaning too far forward during the movement. Ensure that your elbows stay in a fixed position throughout the exercise, pointing straight up towards the ceiling. Avoid letting the weight(s) swing or lose control. 5.     Bench Dips Image Source How To Do It? Sit on the edge of a sturdy bench or chair, placing your hands shoulder-width apart on the edge of the bench, fingers facing forward. Extend your legs out in front of you, heels resting on the ground, and keep your feet hip-width apart. Slide your buttocks off the bench, supporting your body weight with your hands and arms. Lower your body by bending your elbows and allowing your shoulder blades to retract until your upper arms are parallel to the ground. Pause briefly, then push yourself back up by straightening your arms, while keeping your back close to the bench. Benefits Bench dips is one of

Read More »
Calisthenics Leg Exercises

7 Calisthenics Leg Exercises To Elevate Your Leg Game From Ordinary To Extraordinary

Are you ready to take your leg workouts up a notch? Are you looking for new exercises that will challenge your lower body and help build strength? Look no further than calisthenics! With its combination of dynamic moves and isometric holds, calisthenics can help tone your legs like never before. So, get ready to experience some serious burn with these cream-of-the-crop calisthenics leg exercises: Related Blog: Calisthenics Shoulder Exercises Calisthenics Leg Workout No Equipment For Beginners Listed below are the top calisthenics leg exercises you can do at home: 1.     Wall Sit Image Source Wall sits is one of the beginner-level calisthenics leg exercises that primarily target the quadriceps (the muscles on the front of your thighs), but they also engage the glutes, hamstrings, and calves. This exercise helps to strengthen and tone the lower body, improve muscular endurance, and enhance stability and balance. Step-Wise Guide Find a wall and stand with your back to it, with your feet shoulder-width apart. Slowly lower your body by bending your knees, as if you were sitting on a chair. Throughout the exercise, keep your back flat on the wall. Lower yourself until your thighs are parallel to the ground or your knees are at a 90-degree angle. It is critical to keep this position for the specified amount of time. Pull your belly button towards your spine to engage your core muscles, and keep your weight in your heels. Maintain proper posture by keeping your back straight and your shoulders from rounding. Tips: Start with shorter durations and gradually increase the time as you build strength. It can be helpful to set a timer or use a stopwatch to track your progress. Remember to breathe steadily throughout the exercise. Mistakes to avoid: Avoid letting your knees extend beyond your toes, as this can strain your knees unnecessarily. Additionally, avoid arching your lower back or letting it come off the wall, as this can compromise your form. 2.     Standard Squat Image Source Standard squats are a compound exercise that targets multiple muscle groups simultaneously, including the quadriceps, hamstrings, glutes, and calves. They are amongst the easiest calisthenics leg workout that helps to build lower body strength, increases muscle mass, improves balance and coordination, and enhances functional movement patterns. Squats also have the potential to boost your metabolism and aid in fat loss due to their high energy expenditure. Step-Wise Guide Begin by standing with your feet shoulder-width apart, or slightly wider if you want. Pull your belly button towards your spine to engage your core, and keep your chest elevated throughout the workout. Begin the action by bending your knees and lowering your torso, as if you were sitting back in a chair. Aim for your thighs to be parallel to the ground or your knees to be at a 90-degree angle. Lower yourself by pulling your hips back and keeping your weight in your heels. Push through your heels to return to the starting position once you’ve reached the desired depth. Tips: Maintain proper form by keeping your back straight, avoiding rounding your shoulders, and ensuring that your knees stay in line with your toes throughout the movement. It can be helpful to pick a spot on the wall in front of you and focus on it to maintain balance. Mistakes to avoid: Avoid letting your knees collapse inward, as this can strain the knee joint. Additionally, refrain from arching your lower back or leaning too far forward. Calisthenics Leg Exercises For Intermediates If you are a beginner who is eager to get started with leg calisthenics, here are a couple of workouts to add to your routine: 3.     Glute Bridge Image Source It helps to strengthen and tone the glutes, improve hip stability, and enhance overall lower body strength. The glute bridge can also aid in improving posture and reducing lower back pain. The glute bridge targets the glutes and hamstrings, while also engaging the core and lower back muscles. Step-Wise Guide Begin by lying flat on your back with your knees bent and your feet hip-width apart on the ground. Put your arms at your sides, palms down. Engage your abs and press through your heels to lift your hips off the ground, forming a straight line from your knees to your shoulders. Squeeze your glutes at the peak for a second, then slowly descend your hips back to the beginning position. Repeat until the desired number of repetitions has been reached. Tips: Focus on driving through your heels and maintaining a neutral spine throughout the exercise. Avoid arching your lower back excessively. Mistakes to avoid: Do not push your hips too high, as this can strain your lower back. Also, avoid letting your knees collapse inward or flare out to the sides. 4.     Pistol Squat Image Source Pistol squats are a challenging calisthenics leg exercise for mass that works the quads, hamstrings, glutes, and core muscles. They help to improve leg strength, balance, stability, and single-leg coordination. Pistol squats also require greater flexibility and mobility in the hips and ankles. Step-Wise Guide Begin by standing with your feet shoulder-width apart, then lift and stretch one foot forward. For balance, extend your arms in front of you. Lower your body down on the supporting leg while extending your other leg forward, keeping your back straight and chest up. Descend until your supporting leg is 90 degrees off the ground and your extended leg is parallel to the ground. To return to the beginning position, push through your heel. Rep with the opposite leg. Tips: Start with a modified version by holding onto a stable object for balance. As you progress, you can gradually increase the range of motion and challenge yourself to perform the pistol squat without assistance. Mistakes to avoid: Avoid leaning too far forward or inward, and ensure that your knee tracks in line with your toes to maintain proper alignment. 5.     Glute Kickback Image Source Glute kickbacks work the glutes, specifically the gluteus maximus. They help

Read More »
Skincare routine after 40s

Age Gracefully: Expert-Approved Skincare Routine For Women Over 40

Welcome, fabulous 40-somethings, to a skincare journey that will make your skin sing with joy. Are you ready to discover the secrets to maintaining a youthful, radiant complexion in your 40s? Of course, you are! After all, who wouldn’t want their skin to look as stunning as they feel? We know you’re passionate about skincare, and we’re here to satisfy your thirst for knowledge with an engaging and comprehensive guide regarding “Skincare routine to follow after 40s”. So, let’s embark on this adventure together and unveil the ultimate skincare routine that will have your skin thanking you profusely: Best skincare routine in and after your 40s Here are some skincare tips to follow in your 40s to have glowing and radiant skin: 1. Cleanse Your Skin Thoroughly Image Source Cleanse your skin twice a day, morning and night, using a gentle yet effective cleanser. This step is crucial to remove dirt, oil, and impurities accumulated throughout the day. Opt for a cleanser suitable for your skin type, whether it’s dry, oily, or combination. Gently massage the cleanser onto your skin in circular motions for at least 60 seconds, focusing on areas prone to congestion or makeup buildup. Rinse it off with lukewarm water to reveal a clean canvas for the rest of your routine. 2. Use A Gentle Exfoliator Exfoliation is key for rejuvenating your skin and promoting a youthful glow. Our skin’s natural exfoliation process slows down as we age, leading to a dull complexion. Incorporate a gentle exfoliator into your routine 2-3 times a week to remove dead skin cells, unclog pores, and improve skin texture. Look for exfoliators containing AHAs (alpha hydroxy acids) or BHAs (beta hydroxy acids) like glycolic acid or salicylic acid in order to take care of your skin after 40s. These ingredients provide effective yet gentle exfoliation, revealing fresher, brighter skin. 3. Apply A Moisturizer With Anti-Aging Properties Image Source In your 40s, hydration becomes even more vital to maintain skin elasticity and suppleness. Choose a moisturizer specifically formulated for mature skin that includes ingredients like hyaluronic acid, peptides, or ceramides. These ingredients help replenish moisture, reduce the appearance of fine lines and wrinkles, and enhance your skin’s overall firmness. Apply your moisturizer twice a day, after cleansing and toning, using upward strokes to promote better absorption and stimulate circulation. 4. Use A Serum To Target Specific Skin Concerns Serums are potent allies in your skincare arsenal. They contain a high concentration of active ingredients that penetrate deep into the skin, addressing specific concerns such as hyperpigmentation, uneven skin tone, or sagging. Depending on your skin’s needs, look for serums containing ingredients like vitamin C, niacinamide, hyaluronic acid, or peptides. Apply a few drops of serum after cleansing and toning, gently pressing it into your skin to enhance absorption. Using a suitable serum is probably one of the finest ways of caring for your skin in your 40s and beyond. 5. Incorporate A Retinol Or Retinoid Into Your Routine Retinols and retinoids are renowned for their remarkable anti-aging properties. These vitamin A derivatives help stimulate collagen production, reduce the appearance of wrinkles, and improve skin texture. Start by introducing a low-concentration retinol product into your routine, initially using it a few times a week, gradually increasing frequency as your skin adapts. Apply it at night after cleansing and toning. Begin with a pea-sized amount and gently massage it into your skin. Allow your skin to fully absorb the product before proceeding with the rest of your nighttime routine. It’s important to note that retinol products may cause initial dryness or sensitivity, so it’s advisable to follow up with a moisturizer to keep your skin hydrated and nourished. 6. Protect Your Skin From Sun Damage With SPF Image Source Sun protection is a non-negotiable step at any age, but it becomes increasingly crucial if you are in search of the best skincare routine to follow after your 40s. Invest in a broad-spectrum sunscreen with a minimum SPF of 30 to shield your skin from harmful UV rays. Apply it generously to all exposed areas of your face, neck, and any other areas exposed to the sun, even on cloudy days, to prevent premature aging, sunspots, and skin discoloration. Reapply every two hours or more frequently if sweating or swimming. 7. Include Antioxidants In Your Skincare Regimen Antioxidants play a vital role in neutralizing free radicals and protecting your skin in and after 40s against environmental damage. Look for skincare products infused with antioxidants like vitamin C, vitamin E, green tea extract, or resveratrol. These ingredients help combat oxidative stress, promote a youthful complexion, and enhance overall skin health. Incorporate an antioxidant-rich serum or moisturizer into your routine, applying it after cleansing and toning to reap the maximum benefits of these powerful ingredients. 8. Hydrate Your Skin From Within By Drinking Plenty Of Water Image Source Healthy skin starts from within, so remember to hydrate your body adequately if you are wondering what skincare routine you should follow in your 40s. Drinking enough water throughout the day helps flush out toxins, maintain skin elasticity, and promote a natural, youthful glow. Aim for at least eight glasses of water daily, and consider incorporating hydrating foods into your diet, such as fruits and vegetables with high water content. This simple step will support your skincare routine and contribute to your overall well-being. 9. Get Enough Sleep To Promote Skin Rejuvenation Quality sleep is essential for your skin’s rejuvenation process. During deep sleep, your body repairs and regenerates cells, including those in your skin. Aim for 7-8 hours of uninterrupted sleep each night to allow your skin to undergo its natural healing and renewal process. Establish a consistent bedtime routine, create a sleep-friendly environment, and prioritize relaxation techniques to improve your sleep quality and wake up with refreshed, glowing skin. 10. Consult With A Dermatologist Image Source While this comprehensive skincare routine after 40s provides a strong foundation, it’s essential to remember that everyone’s skin is unique.

Read More »
Best Compound Back Exercises

7 Essential Compound Back Exercises For Athletes & Fitness Enthusiasts

Are you getting the most out of your back-day workouts? If you’re like most people who take pride in their upper body growth, you may think so – but there are plenty of ways to maximize your gains and get more from each session. One way is to focus on compound exercises for your back, which can stimulate and engage multiple muscles at once. Today we’re going to show why these exercises work so well and then list our top picks for the five best compound back exercises that will help build a strong, wide back worthy of envy: Best Compound Back Exercises At Home Let’s have a look at the compound workouts for the back that could be done at home with minimal equipment: 1. Towel Chin-Up Image Source  If you are looking for the best compound back workout to do at home, consider the towel chin-ups, as they are ingenious for the lats, biceps, and upper back muscles. They engage the forearms and core for stability. This exercise helps to improve grip strength, develop a stronger back and biceps, and enhance overall upper-body pulling power. Step-Wise Guide: Hang a towel over a sturdy horizontal bar or use a specialized towel grip attachment. Grab the towel with an underhand grip, hands slightly wider than shoulder-width apart. Hang from the towel with your arms fully extended, engaging your core. Pull your body up towards the bar, leading with your chest and squeezing your shoulder blades together. Continue the upward movement until your chin reaches or clears the bar. Slowly lower your body back down to the starting position. Repeat for the desired number of repetitions. Pro Tips: Engage your core to maintain stability throughout the exercise. Focus on pulling with your back muscles rather than relying solely on your arms. Use a spotter or assistance if needed to perform the exercise with proper form. 2. Single-Arm Row Image Source The Single-Arm Row targets the lats, rhomboids, traps, and rear delts. It is one of the compound back workouts with dumbbells that help to improve unilateral strength and muscular balance, enhance grip strength, and promote better posture. Step-Wise Guide: Stand with your feet shoulder-width apart, holding a dumbbell in one hand. Bend forward at the hips, keeping your back flat and core engaged. Allow the dumbbell to hang straight down towards the floor. Pull the dumbbell up towards your hip, keeping your elbow close to your body and squeezing your shoulder blade. Lower the dumbbell back down in a controlled manner. Repeat for the desired number of repetitions and then switch to the other arm. Pro Tips: Maintain a neutral spine throughout the exercise. Avoid excessive rotation or twisting of the torso. Focus on pulling with your back muscles rather than using your bicep. 3. The Farmer’s Carry Image Source The Farmer’s Carry is a compound back workout with dumbbells that is ideal for targeting the muscles in the upper back, traps, and forearms. This exercise improves grip strength, builds overall back and shoulder stability, and enhances functional strength. Step-Wise Guide: Stand with a dumbbell or kettlebell in each hand, arms fully extended by your sides. Maintain an upright posture, engaging your core and keeping your shoulders back. Begin walking forward, taking controlled steps while maintaining the weights at your sides. Continue walking for a predetermined distance or time. Pro Tips: Keep your shoulders down and back, avoiding shrugging or slouching. Walk with a natural gait and maintain control throughout the exercise. Start with lighter weights and gradually increase Best Compound Back Exercises For Mass Would you like to know about the compound back workouts that produce mass? Check out the following exercises: 4. Landmine Row Image Source The Landmine Row is one of the best compound back exercises that target the muscles in your upper back, including the rhomboids, traps, and rear delts. It also engages the muscles in your core and arms. This exercise helps to improve posture, build upper body strength, and develop a strong and stable back. Step-Wise Guide: Stand with your feet shoulder-width apart and place a barbell into a landmine attachment or secure it in a corner. Hold the end of the barbell with one hand, keeping your back straight and core engaged. Pull the barbell up towards your chest, squeezing your shoulder blades together. Lower the barbell back down in a controlled manner. Repeat for the desired number of repetitions and then switch to the other arm. Pro Tips: Keep your core tight throughout the movement to stabilize your body. Focus on pulling your shoulder blades together to fully engage the back muscles. Avoid using excessive momentum or jerking motions. 5. Bent-Over Row Image Source This exercise helps to build overall back strength, improve posture, and develop a strong and well-rounded upper body. It targets the entire back, including the lats, rhomboids, traps, and rear delts, along with engaging the biceps and forearms. Step-Wise Guide: Stand with your feet shoulder-width apart, holding a barbell or dumbbells in front of your thighs. Bend forward at the hips, keeping your back flat and core engaged. Allow the weights to hang straight down towards the floor. Pull the weights up towards your lower chest, leading with your elbows and squeezing your shoulder blades. Lower the weights back down in a controlled manner. Repeat for the desired number of repetitions. Pro Tips: Keep your back flat and avoid rounding your shoulders. Engage your core to maintain stability. Start with lighter weights to ensure proper form before progressing to heavier loads. 6. Cable Trap Shrug Image Source It’s a compound back workout that focuses on the trapezius muscles responsible for shrugging and retracting the shoulder blades. Step-Wise Guide: Stand in front of a cable machine with the cable set to a low position. Grasp the handle with an overhand grip and arms fully extended down in front of you. Shrug your shoulders upward, pulling the handle towards your ears. Squeeze your traps at the top of the movement

Read More »

Unleashing The Top 10 Benefits Of Facial For A Youthful Skin

In the pursuit of healthy and radiant skin, we often explore various skincare routines, products, and treatments. Among the array of options available, facials stand out as a transformative and rejuvenating experience that can elevate your skincare regimen to new heights. More than just a spa indulgence, facials offer many benefits beyond mere relaxation, providing your skin with the care it deserves. This blog post will discuss the benefits and advantages of facials for the skin. Whether you’re seeking a clearer complexion, youthful radiance, or a soothing sanctuary for your skin, understanding the comprehensive benefits of facials can help you make informed decisions about your skincare journey. From deep cleansing and exfoliation to stimulating collagen production and promoting a healthy glow, facials encompass a range of remarkable advantages that can transform your skin’s appearance and overall well-being. Join us as we explore the extraordinary benefits that await you within the realm of facials, empowering you to unlock your natural radiance and embark on a path toward revitalized and rejuvenated skin. What Are The Facial Benefits For Skin? Listed below are the top 10 skin benefits of facials you wish you’d known sooner: 1.     Cleanses The Skin Image Source A facial begins with a thorough cleansing of the skin, which removes dirt, oil, and impurities that accumulate throughout the day. Professional estheticians employ specially formulated cleansers that target your skin type, ensuring a deep cleanse without stripping away essential moisture. By effectively removing debris, a facial helps to unclog pores, preventing breakouts and promoting a clearer complexion. 2.     Exfoliates Dead Skin Cells Image Source Exfoliation is one of the biggest advantages and benefits of facials for the skin. Facials reveal fresh, healthy skin underneath by gently sloughing away dead skin cells. This process stimulates cell turnover, promoting a smoother texture and enhancing the skin’s ability to absorb subsequent products. Exfoliation also aids in fading acne scars, sunspots, and other hyperpigmentation issues, leading to a more even and radiant skin tone. 3.     Improves Blood Circulation During a facial, a skilled esthetician performs various massage techniques, which help to improve blood circulation in the face. Increased blood flow delivers oxygen and essential nutrients to the skin cells, promoting their health and vitality. Enhanced circulation is the benefit of a professional facial that also aids in the elimination of toxins, reducing puffiness and giving the skin a youthful, revitalized appearance. 4.     Stimulates Collagen Production Collagen, a key structural protein, plays a crucial role in maintaining the skin’s firmness and elasticity. As we age, collagen production naturally declines, leading to sagging skin and the formation of wrinkles. Facials often incorporate treatments, such as facial massages and LED therapy, which stimulate collagen production. This encourages the skin to restore its youthful resilience, resulting in firmer and more supple skin over time. 5.     Reduces Puffiness & Under-Eye Bags Image Source Another ingenious benefit of facials is that they involve lymphatic drainage massage techniques, which can effectively reduce puffiness and under-eye bags. By gently stimulating the lymphatic system, excess fluid is drained away, alleviating swelling and promoting a more refreshed appearance. Combined with cold compresses or specialized eye treatments, facials can target this delicate area, minimizing puffiness and dark circles for a brighter, well-rested look. 6.     Tightens & Firms The Skin Loss of skin elasticity is a common concern as we age, leading to sagging and drooping. Facials often include treatments such as radiofrequency or ultrasound therapy, which use heat or sound waves to penetrate deep into the skin, stimulating collagen production and promoting skin tightening. These innovative techniques help restore a firmer and more lifted appearance, providing a non-invasive alternative to surgical procedures. 7.     Enhances Skin Elasticity Image Source One of the major benefits of facials is that they can boost the skin’s elasticity by nourishing it with vital nutrients. Many facials involve the application of specialized masks, serums, and moisturizers that are formulated to address specific skin concerns. These products are packed with ingredients such as hyaluronic acid, peptides, and antioxidants, which deeply hydrate, repair, and protect the skin. By infusing the skin with these beneficial compounds, facials help to improve elasticity and promote a more youthful complexion. 8.     Minimizes The Appearance Of Wrinkles Facials can effectively address the signs of aging, such as wrinkles and fine lines. With targeted treatments like microdermabrasion, chemical peels, or laser therapies, the outermost layer of the skin is gently resurfaced, encouraging the growth of new, smoother skin. This process helps diminish wrinkles and fine lines, revealing a more youthful and rejuvenated complexion. 9.     Soothes & Calms The Skin Facials offer a soothing and calming effect for those with sensitive or irritated skin. Estheticians use gentle techniques and products specifically formulated for sensitive skin to minimize redness, inflammation, and discomfort. Ingredients like chamomile, aloe vera, and green tea are often incorporated into facial treatments, providing anti-inflammatory and soothing properties that help restore balance and tranquility to the skin. 10.  Promotes A Healthy Glow Image Source Last but not least, facials are renowned for their ability to impart a healthy and radiant glow to the skin. Facials remove dullness and congestion by deeply cleansing and exfoliating the skin, allowing the skin’s natural luminosity to shine through. The elimination of dead skin cells and impurities reveals a fresh and rejuvenated complexion, while improved blood circulation delivers vital nutrients and oxygen to the skin cells, enhancing their vitality and radiance. One of the many facial benefits is that they often incorporate hydrating and nourishing treatments that restore moisture and plumpness to the skin, further contributing to a vibrant and healthy glow. Whether you have a special occasion or desire a revitalized appearance, facials can effectively bring out your skin’s natural luminosity and leave you with a radiant and glowing complexion. Wrapping Up Facials have proven to be more than just a luxury treat; they are a gateway to unlocking your skin’s full potential. In this blog post, we have delved into the captivating world of facial benefits for the skin, shedding light

Read More »
How to stay fit on vacation

10 Quick & Effective Ways To Stay Fit On Vacation

Picture this: you’re lounging on a sun-kissed beach, feeling the gentle breeze and listening to the soothing sounds of waves crashing against the shore. You’re on vacation, a well-deserved break from the daily grind, where relaxation and indulgence seem to take center stage. It’s easy to let go of your fitness routine and give in to the temptations of leisurely days filled with decadent meals and sweet treats. However, staying fit and healthy doesn’t have to be impossible while enjoying your time away. In this blog post, we’ll explore practical strategies and effective tips on how to stay fit on vacation while still savoring every moment. Whether you’re planning a tropical getaway, an adventurous excursion, or a cultural exploration, we’ll guide you through simple yet impactful ways to prioritize your health and well-being amidst the allure of new experiences. So, pack your bags, bring your enthusiasm, and let’s embark on a journey of wellness and enjoyment like never before: 1.      Rise and Shine with a Morning Run or Walk Image Source Kickstart your day with an invigorating morning run or walk as a way to stay fit on vacations. As the sun rises, lace up your running shoes or slip into comfortable walking attire. Immerse yourself in the surroundings, whether it’s a tranquil beach, a picturesque park, or a vibrant city street. Not only will you get your blood pumping, but you’ll also witness breathtaking views and capture the true essence of your vacation destination. 2.      Embrace the Great Outdoors Image Source Escape the confines of your hotel and embrace the great outdoors. Explore the natural wonders of your destination by engaging in outdoor activities like cycling or hiking. Rent a bike and pedal through scenic trails, immersing yourself in the beauty of nature. Alternatively, embark on a thrilling hike that takes you off the beaten path, allowing you to discover hidden gems and breathtaking vistas. These activities provide an excellent cardiovascular workout and leave you with unforgettable memories. 3.      Dive into Refreshing Water Activities Image Source If you are searching for how to stay fit while on the road, we recommend you embrace water activities. Take advantage of the crystal-clear oceans, tranquil lakes, or sparkling pools surrounding you. Swim laps to improve your cardiovascular endurance while engaging multiple muscle groups. Snorkeling allows you to explore vibrant underwater ecosystems, encountering colorful marine life and reefs. These refreshing water activities offer a delightful way to stay active while enjoying the beauty of nature. 4.      Find Fitness Classes or Local Gyms Image Source Immerse yourself in the local fitness scene by seeking out fitness classes or nearby gyms. Many vacation destinations offer specialized classes for tourists, ranging from beachside yoga sessions to high-intensity interval training (HIIT) workouts. Participating in these classes helps you stay fit while traveling and allows you to connect with like-minded individuals and experience the local wellness culture. If you prefer a more structured workout, consider visiting a local gym to access state-of-the-art equipment and professional guidance. 5.      Indulge in Thrilling Adventure Sports Image Source Inject extra excitement into your vacation by trying out thrilling adventure sports. Embrace the adrenaline rush of rock climbing as you conquer vertical cliffs or embark on a kayaking expedition, navigating through scenic waterways. If you crave a bird’s-eye view, zip-lining offers a heart-pounding experience while soaring above breathtaking landscapes. These exhilarating activities not only challenge your physical limits but also create lifelong memories and a sense of accomplishment, helping you stay in shape while enjoying yourself. 6.      Explore on Foot with Guided Walking Tours Image Source Uncover the hidden treasures of your destination through immersive walking tours. Guided tours offer a unique blend of physical activity and cultural exploration. One of the best tips to stay fit while on vacation is to join a walking tour led by knowledgeable guides who will take you through historical sites, vibrant neighborhoods, and iconic landmarks. As you stroll along bustling streets and picturesque avenues, you’ll learn intriguing stories, experience local flavors, and capture remarkable photographs. Walking tours ensure you stay active while embracing your vacation spot’s rich heritage and distinct character. 7.      Quick and Effective Workouts with Resistance Bands Image Source Don’t let the absence of a gym hinder your fitness routine. Pack lightweight resistance bands in your suitcase for a portable workout solution. These versatile bands allow you to target different muscle groups with exercises such as bicep curls, squats, and lateral band walks. In the comfort of your hotel room or amidst serene natural surroundings, dedicate time to a quick, effective resistance band workout. Using resistance bands for exercise is probably the best way to stay fit on vacation at home. Engage your core, strengthen your muscles, and improve your overall fitness wherever you go. 8.      Engage in Active Sightseeing Image Source Make sightseeing an active and immersive experience by incorporating physical activities into your exploration. Instead of relying solely on tour buses or taxis, choose to walk or bike to your destinations. This way, you can soak in the vibrant atmosphere, discover hidden gems, and interact with locals along the way. Whether it’s exploring historic sites, meandering through lively markets, or admiring architectural marvels, active sightseeing ensures that you not only see the sights but also feel connected to the pulse of your vacation spot. 9.      Opt for Stairs Over Elevators Image Source Choosing stairs over elevators is a simple yet effective tip for infusing fitness into your vacation routine. Skip the easy route and challenge yourself by taking the stairs whenever possible. Whether you’re climbing up to a stunning viewpoint or descending to a bustling street, stair climbing engages your leg muscles, elevates your heart rate, and burns calories. Plus, you’ll feel a sense of accomplishment as you conquer each flight of stairs, knowing that you’re prioritizing your fitness and well-being. 10. Nourish Your Mind and Body with Yoga and Meditation Image Source While vacations are a time to relax, nourishing your mind and body is equally essential. Set aside moments

Read More »

Nourish & Revitalize Your Skin With Orange Juice | Top 10 Benefits

Radiant, glowing skin is a universal desire for both men and women. Countless skincare products flood the market, promising miraculous transformations, but have you ever considered the power of nature’s elixirs? In the quest for a vibrant complexion, one often overlooked gem is orange juice. Packed with essential nutrients, antioxidants, and a burst of refreshing flavor, orange juice offers a multitude of benefits that can truly transform your skin. In this blog post, we invite you to delve into the world of orange juice and explore its extensive benefits for your skin. From hydration and rejuvenation to protection against aging and blemishes, the wonders of orange juice are waiting to be unveiled. So, grab a glass of freshly squeezed orange juice and let us embark on a journey to unlock the benefits of drinking orange juice daily: Top 10 Beauty and Skin Benefits Of Drinking Orange Juice Let’s talk about the best orange juice benefits for the skin you wish you’d known sooner: 1.     Hydrates The Skin Image Source Proper hydration is crucial for maintaining healthy skin. Orange juice contains a high-water content that helps to replenish and hydrate your skin cells. It acts as a natural moisturizer, assisting in retaining moisture within the skin. The hydration provided by orange juice promotes a plump and supple appearance, reducing the occurrence of dryness, flakiness, and the appearance of fine lines. One of the benefits of regular consumption of orange juice is that it helps create a protective barrier on the skin, preventing moisture loss and maintaining optimal hydration levels. 2.     Provides Vitamin C Image Source Vitamin C is a powerhouse nutrient with numerous benefits for skin health. Orange juice is rich in vitamin C, which is essential for the production of collagen—a protein that provides structure and elasticity to the skin. Collagen helps to maintain the firmness and smoothness of the skin, reducing the appearance of wrinkles and fine lines. By consuming orange juice, you supply your body with a generous dose of vitamin C, supporting the production of collagen and contributing to a more youthful and resilient complexion. Additionally, vitamin C acts as an antioxidant, protecting the skin against free radical damage and reducing inflammation. 3.     Helps In Skin Cell Regeneration The natural acids present in orange juice, such as citric acid, act as gentle exfoliants that promote skin cell regeneration. By exfoliating the outer layer of dead skin cells, orange juice helps to unclog pores and stimulate the growth of new, healthy skin cells. This process reveals a fresh and youthful complexion and helps prevent acne breakouts by removing impurities and excess sebum. Skin cell regeneration is probably one of the biggest advantages of orange juice for the skin, as it can aid in maintaining clear, smooth, and rejuvenated skin. 4.     Boosts Collagen Production Collagen is a vital component of the skin’s structure, and its production naturally declines with age. However, orange juice contains nutrients like vitamin C and amino acids that stimulate collagen synthesis. By consuming orange juice regularly, you provide your body with the necessary building blocks to produce collagen. This promotes skin elasticity, minimizes the appearance of wrinkles and sagging, and improves overall skin texture. The increased collagen production also aids in wound healing and reduces the visibility of scars and blemishes, leaving your skin smoother and more even-toned. 5.     Improves Skin Elasticity Image Source Loss of skin elasticity is a common sign of aging, resulting in sagging and wrinkles. Another beauty benefit of orange juice is that it helps combat this issue by enhancing the elasticity of the skin. Vitamin C, found abundantly in orange juice, aids in the production of elastin fibers, which are responsible for the skin’s ability to stretch and snap back into place. By incorporating orange juice into your diet, you can support the elasticity of your skin, leading to a firmer and more youthful appearance. 6.     Enhances Skin Texture Uneven skin texture can be a source of frustration for many individuals. However, the natural acids in orange juice, such as citric acid, help gently exfoliate the skin. This exfoliation removes dead skin cells, unclogs pores, and promotes cell turnover, resulting in a smoother and more refined skin texture. One of the benefits of drinking orange juice daily for your skin is that it can aid in reducing the appearance of roughness, bumpy skin, and acne scars, giving you a smoother and more even complexion. 7.     Reduces Blemishes and Dark Spots Image Source Orange juice contains natural bleaching properties that can effectively lighten blemishes and dark spots. The high vitamin C content helps to inhibit the production of melanin, the pigment responsible for dark spots and hyperpigmentation. Regularly consuming orange juice can contribute to a more even skin tone and fade the appearance of blemishes, scars, and sunspots, revealing a clearer and more radiant complexion. 8.     Fights Signs Of Aging Aging is a natural process that affects the skin’s appearance, leading to the formation of wrinkles, fine lines, and age spots. Orange juice contains potent antioxidants, including vitamin C, which help combat the signs of aging. These antioxidants neutralize free radicals that contribute to premature aging, protecting the skin from damage caused by environmental factors such as pollution and UV radiation. By drinking orange juice daily, you can support your skin’s defense mechanisms and reduce the appearance of fine lines and wrinkles, promoting a more youthful and rejuvenated complexion. 9.     Promotes A Healthy Complexion If you are wondering, “Does orange juice brighten skin” the answer is YES. Orange juice is rich in essential vitamins, minerals, and antioxidants contributing to overall skin health. The combination of vitamin C, vitamin A, and antioxidants helps to improve blood circulation, ensuring that the skin receives an adequate supply of oxygen and nutrients. This enhanced blood flow promotes a healthy complexion by delivering nutrients to the skin cells, improving skin tone, and giving your face a natural glow. Orange juice can help combat dullness, leaving your skin looking vibrant and refreshed. 10.  Gives A Natural

Read More »

9 Best Calisthenics Shoulder Exercises For Peak Strength & Stability

Are you looking for calisthenics shoulder exercises that can help you improve your upper body strength and overall fitness? Do you want to build strong, stable shoulders without the need for expensive gym equipment or heavy weights? If so, you’re in the right place. In this blog post, we’ll take a look at the best calisthenics shoulder exercises for beginners and advanced that you can do anywhere, anytime, with no equipment necessary. Calisthenics exercises are a great way to build strength, flexibility, and endurance using only your body weight as resistance. By incorporating these exercises into your workout routine, you can improve your posture, reduce your risk of injury, and build strong, stable shoulders that can help you easily perform everyday tasks. From standing IYT raises to Australian Pull-Up, we’ll cover some of the best calisthenics shoulder workouts in detail, including step-by-step instructions and recommended sets and reps. So, let’s get started if you are eager to know how to train shoulders with calisthenics: Best Calisthenics Shoulder Workout For Beginners Listed below are the most effective and result-driven calisthenics shoulder exercises for beginners: 1. Standing IYT Raises The standing IYT raises are a great calisthenics shoulder exercise for strengthening the shoulders and upper back. This exercise targets the rear deltoids responsible for shoulder extension and rotation. Here’s how to do it: Stand with your feet shoulder-width apart and hold a pair of dumbbells in your hands, with your palms facing your thighs. Raise the dumbbells up to shoulder height, with your elbows bent and your palms facing forward. Slowly raise the dumbbells out to the sides, keeping your elbows bent until your arms are in a Y shape. Hold for a second, then lower the dumbbell back down to the starting position. Recommended sets and reps: 3 sets of 8-10 reps. 2. Crab Walk Image Source The crab walk is a fun and challenging exercise that targets the shoulders, triceps, and core. It’s a great calisthenics shoulder exercise for beginners that is ideal for building shoulder stability and improving overall body control. Here’s how to do it: Sit on the ground with your feet flat on the floor and your hands placed behind your hips, fingers facing forward. Lift your hips off the ground, so that your body forms a straight line from your head to your knees. Walk forward using your hands and feet, alternating left hand and right foot, then right hand and left foot. Recommended sets and reps: 4 sets of 6-10 reps. 3. Shoulder Tap Image Source The shoulder tap is another effective exercise for building shoulder and core strength and improving body control and balance. Here’s how to do it: Start in a high plank position, with your hands shoulder-width apart and your feet together. Lift your right hand off the ground and tap your left shoulder, then return your hand to the ground. Repeat with your left hand, tapping your right shoulder. Recommended sets and reps: 3 sets of 10-12 taps. 4. Bodyweight Lateral Raise Image Source This exercise targets the lateral (or side) deltoid muscles responsible for lifting your arms out to the side. It’s probably the best calisthenics no equipment shoulder workout to tone your arms like never before. Here’s how to do it: Stand with your feet shoulder-width apart and your arms at your sides. Raise your arms out to the sides until they’re parallel to the ground, keeping your elbows slightly bent. Hold for a second or two at the top of the movement, then slowly lower your arms back down to your sides. Recommended sets and reps: 5 sets of 8-10 reps. 5. Wall Walks Image Source This exercise targets the shoulders, core, and arms. It’s a great exercise for building upper body strength and improving your overall stability. Here’s how to do it: Stand facing a wall with your feet shoulder-width apart. Place your hands on the ground and walk your feet up the wall until you’re in a handstand position. Walk your hands towards the wall until your nose almost touches it. Walk your hands back out to the starting position. Recommended sets and reps: 3 sets of 5-8 reps. Advanced Calisthenics Shoulder Exercises If you are not new to calisthenics, these intermediate to advanced calisthenics shoulder exercises will surely get your attention: 6. Planche Pushup Image Source The planche pushup is an advanced calisthenics shoulder exercise that requires a great deal of strength and body control. It targets the shoulders, chest, triceps, and core. Here’s how to do it: Start in a plank position, with your hands shoulder-width apart and your feet together. Shift your weight forward and lift your feet off the ground so that your body is parallel to the ground. Bend your elbows and lower your body down towards the ground, keeping your elbows close to your body. Push back up to the starting position. Recommended sets and reps: 3 sets of 5-8 reps. 7. Plank to Down Dog Image Source The plank to down dog has to be on your list of top calisthenics shoulder workouts if you want to build shoulder and core strength along with improving flexibility in the hamstrings and calves. Here’s how to do it: Start in a high plank position, with your hands shoulder-width apart and your feet together. Lift your hips up and back, coming into a downward-facing dog position. Hold for a second, then return to the plank position. Recommended sets and reps: 3 sets of 10-12 reps. 8. Inverted Rows Image Source Inverted rows are amongst the best calisthenics shoulder exercises for intermediate that target the back, biceps, and shoulders. It’s a great exercise for building upper body strength and improving your posture. Here’s how to do it: Find a low bar or set of parallel bars that you can reach while lying on your back. Lie underneath the bar(s) and grab onto them with an overhand grip. Keep your body straight and pull your chest up towards the bar(s), keeping your elbows

Read More »

Bloom With Beauty: 10 Amazing Benefits Of Rose Water For Hair Growth

Do you want to have thicker, longer, and healthier hair without using harsh chemicals or spending a fortune on salon treatments? Do you suffer from dry, itchy, or flaky scalp or dandruff and want to soothe and nourish it naturally? If you answered yes to any of these questions, keep reading to discover the potential benefits of rose water for hair and how to use it effectively. Rose water is a versatile and popular beauty ingredient that has been used for centuries in different cultures. This fragrant and gentle liquid, obtained through steam distillation of rose petals, has many potential benefits for skin, hair, and mood. In this post, we’ll explore the benefits of rose water specifically for hair, including its effects on hair growth, hydration, scalp health, and more. Whether you have dry, oily, damaged, or normal hair, rose water can be a natural and effective addition to your hair care routine. So, let’s get going: What are the benefits of rose water for hair? Let’s have a good look at the rose water benefits for hair growth that will convince you to use it sooner than later: 1.     Hydrates and Moisturizes the Hair Image Source Rose water is a natural source of moisture and can help hydrate and moisturize dry hair. It contains natural oils that can penetrate the hair shaft, providing deep hydration to dry and damaged hair. Rose water can also help improve hair strands’ elasticity, making them more resistant to breakage and split ends. To use rose water as a hair moisturizer, mix it with a carrier oil such as coconut oil or jojoba oil and apply it to your hair and scalp. Leave it on for a few hours or overnight before rinsing it off with shampoo. 2.     Helps Control Frizz and Tame Flyaways Image Source Frizz and flyaways can be frustrating for those with curly or wavy hair. Fortunately, rose water can help to tame frizz and flyaways, and it’s one of the most renowned benefits of rose water for hair. It acts as a natural hair-setting spray and can be applied to damp hair before styling to help keep hair in place and reduce frizz. Additionally, rose water can be used as a detangling spray to help make hair more manageable and easier to style. 3.     Promotes Hair Growth Image Source Are you wondering, “Is rose water good for hair growth” If so, we’ve got you covered. Rose water is rich in vitamins and minerals that can promote hair growth. It contains vitamins A, C, and E, which are essential for hair growth and strength. Additionally, rose water contains antioxidants that can help to stimulate hair follicles and promote hair growth. To use rose water for hair growth, mix it with a carrier oil such as castor oil or argan oil and massage it into your scalp. Leave it on for a few hours or overnight before rinsing it off with shampoo. 4.     Soothes an Itchy Scalp An itchy scalp can be uncomfortable and embarrassing. Rose water can help to soothe an itchy scalp and reduce inflammation. It has antibacterial and antifungal properties that can help to eliminate dandruff and other scalp conditions. Moreover, rose water can help to balance the pH level of your scalp, which can help to reduce itching and flaking. To use rose water for an itchy scalp, mix it with a few drops of tea tree oil and apply it to your scalp. Leave it on for 30 minutes before rinsing it off with shampoo. 5.     Adds Shine to the Hair Image Source Another ingenious rose water benefit for hair is that it adds shine to dull and lifeless hair. It works by sealing the hair cuticles, which can help to reflect light and create a shiny appearance. The natural oils in rose petals can help nourish the hair, leaving it looking healthy and radiant. To use rose water for hair shine, mix it with a few drops of your favorite essential oil and spray it onto your hair. Allow it to dry naturally, or use a hair dryer on low heat. 6.     Helps Prevent Dandruff Image Source Dandruff is a common scalp condition that can be embarrassing and difficult to treat. Rose water can help to prevent dandruff by balancing the pH level of your scalp and reducing inflammation. It has natural antifungal and antibacterial properties that can help to eliminate the fungus that causes dandruff. To use rose water for dandruff prevention, mix it with a few drops of neem oil and apply it to your scalp. Leave it on for 30 minutes before rinsing it off with shampoo. 7.     Reduces Hair Breakage Rose water can help to reduce hair breakage and split ends. Its hydrating properties can help to strengthen hair strands and reduce the likelihood of breakage. The vitamins and minerals found in rose water can nourish the hair, making it more resilient and less prone to damage. To get the full benefits of rose hair for reducing hair breakage, mix it with a protein-rich hair mask and apply it to your hair. Leave it on for 30 minutes before rinsing it off with shampoo. 8.     Soothes a Sunburned Scalp If you’ve spent too much time in the sun, you may experience a sunburned scalp. One of the hair growth benefits of rose water is that it can help to soothe a sunburned scalp and reduce inflammation. Its cooling properties can provide relief from the burning and itching associated with sunburns. Mix rose water for a sunburned scalp with aloe vera gel and apply it to your scalp. Leave it on for 30 minutes before rinsing it off with water. 9.     Acts as a Natural Hair Perfume Rose water has a pleasant floral scent that can act as a natural hair perfume. It can help mask unpleasant odors and keep your hair fresh and clean. To use rose water as a hair perfume, mix it with a few drops of your favorite

Read More »
Best Arm Wrestling Exercises

6 Best Arm-Wrestling Exercises To Unleash Your Inner Hulk

Are you an arm wrestling fanatic trying to take your talents to the next level? Whether you want to dominate the competition with best arm wrestling exercises at upcoming tournaments or simply improve strength for recreational arm wrestling with friends, targeted training is essential. Developing immense power and endurance in your wrist, forearms, biceps and shoulders can help unleash your inner arm wrestling beast. This post will provide a complete guide to the most effective 6 best arm wrestling exercises that target the specific muscles utilized in matches. Moreover, we’ll go over proper form, sets, reps and tips to maximize each movement. Consequently, these intense best arm wrestling exercises will sculpt your arms into steel hammers ready to pin any challenger. In particular, we’ll share a complete 6 week arm wrestling workout program to follow. Best Arm-Wrestling Exercises and Workouts Here are the best arm wrestling exercises and workouts to do at home or anywhere else: 1.     Barbell Wrist Curls   Image Source Barbell wrist curls work the flexor muscles of the forearm and improve wrist strength and grip. Additionally, this arm-wrestling exercise is excellent for building endurance in the wrist and forearm muscles, which is critical for maintaining a strong grip during an arm-wrestling match. Step-Wise Guide: Take an overhand grip on a barbell while you stand with your feet shoulder-width apart. Wrists hanging off the edge, place your forearms on a bench or other secure surface. Furthermore, slowly lower the bar towards the floor by bending your wrists, then lift it back up by curling your wrists towards your forearms. Repeat for several sets of 12-15 reps. Tips: Be sure to keep your forearms still during the exercise. In addition, use a weight that challenges you but still allows you to maintain proper form. Specifically, focus on keeping your wrists straight throughout the movement. Three to four sets of 12 to 15 repetitions are the ideal number of sets.   2.    Single-Arm Hammer Curls   Image Source Single-arm hammer curls is one of the best arm wrestling exercises which target the biceps and forearms and help build overall arm strength. Additionally, It is one of the best arm-wrestling exercises to do at home that is great for improving grip strength to compete well in arm wrestling. Step-Wise Guide: With one hand, hold a dumbbell with the palm facing your body. Moreover, slowly lift the weight up towards your shoulder while keeping your elbow close to your body. Lower the weight until it is back in the beginning position. Eventually, repeat for several sets of 8-10 reps on each arm. Tips: Throughout the motion, maintain a close elbow position to your body. Keep the weight from swinging or lifting it with momentum. At the peak of the exercise, concentrate on contracting your biceps and forearms. The ideal reps and sets are 3-5 sets of 8–10 on each arm.   3.     Wrist Roller   Image Source Improve your arm wrestling skills by using the wrist roller. Furthermore, this workout also targets the muscles in the hands and fingers, which are important for arm wrestling. Step-Wise Guide: A wrist roller should be weighted and held in both hands. Roll the weight up towards your body by twisting the roller with your wrists. Return the weight to its starting position by lowering it gradually. At the end, repeat for several sets of 10-12 reps. Tips: Keep your arms and elbows close to your body. Avoid lifting the weight with your shoulders. Utilise a weight that pushes you but still enables you to keep good form. 2-4 sets of 10–12 reps are the ideal number of sets and reps   4.     Towel Pull-Up Image Source You must include towel pull-ups on your list of the most challenging and effective arm-wrestling exercises. Eventually, It’s a result-oriented exercise that targets the muscles in the hands, wrists, and forearms, which are all essential for arm wrestling. Step-Wise Guide: Grab the towel’s ends with both hands and drape them over the pull-up bar. Pull yourself up towards the bar while keeping your elbows close to your body. Return to the beginning position by lowering yourself. Repeat for several sets of 8-10 reps. Tips: Keep your core tight and your body straight throughout the movement. Use a grip size that feels natural to you. Try jumping up to the top position and lowering yourself down gradually if you are unable to do a full pull-up. Ideal reps and sets are 3–4 sets of 8–10 repetitions.   5.     One-Arm Dumbbell Forearm Curl Image Source One of the best dumbbell arm-wrestling exercises is the one-arm forearm curl. Consequently, this exercise targets the flexor muscles in the forearms, which are responsible for wrist flexion and grip strength. Step-Wise Guide: Hold a dumbbell in one hand with your palm facing up. Your wrist should hang off the edge of a bench or other stable surface as you rest your forearm on it. Bend your wrist to drop the weight gradually to the floor, then curl your wrist towards your forearm to raise it back up. Repeat for several sets of 10-15 reps on each arm. Tips: Keep your forearm stationary throughout the movement. Utilise a weight that pushes you but still enables you to keep good form. Focus on keeping your wrist straight throughout the movement. Ideal number of sets and reps: 2 sets of 12-15 reps on each arm.   6.     Hand Grippers   Image Source Last but not least, make sure you consider hand grippers when searching for the most suitable arm-wrestling exercises for beginners. Meanwhile, the best thing about hand grippers is that you may choose a difficulty level based on your strength. Step-Wise Guide: The handles should be pressed as firmly as possible. Squeeze for a short while, then gradually let go. On each hand, repeat for multiple sets of 15-20 repetitions. Tips: Start with a gripper that is difficult but yet enables you to finish the repetitions with correct form. As your strength increases, gradually

Read More »
Scroll to Top