Blogs

5 Game-Changing Mobility Exercises Every Athlete Should Incorporate

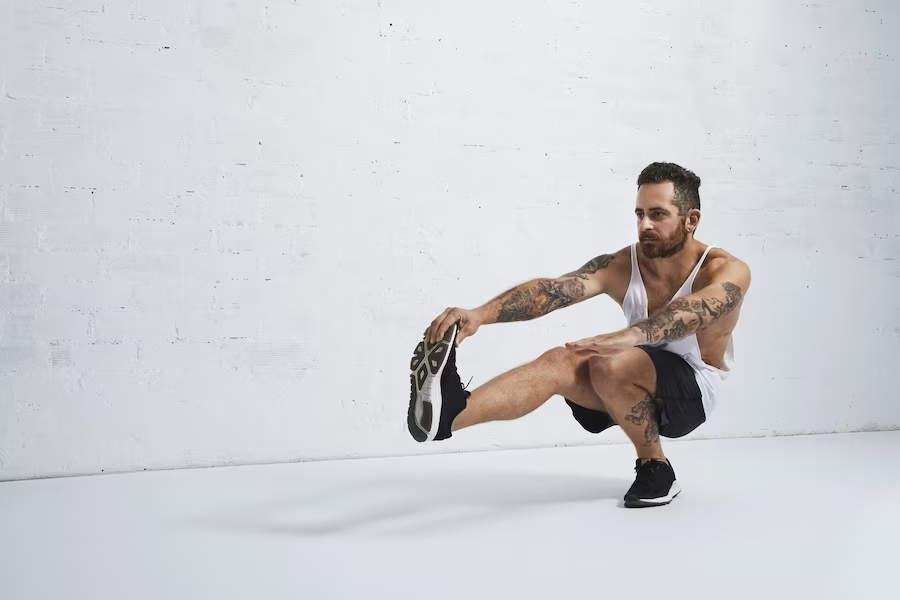
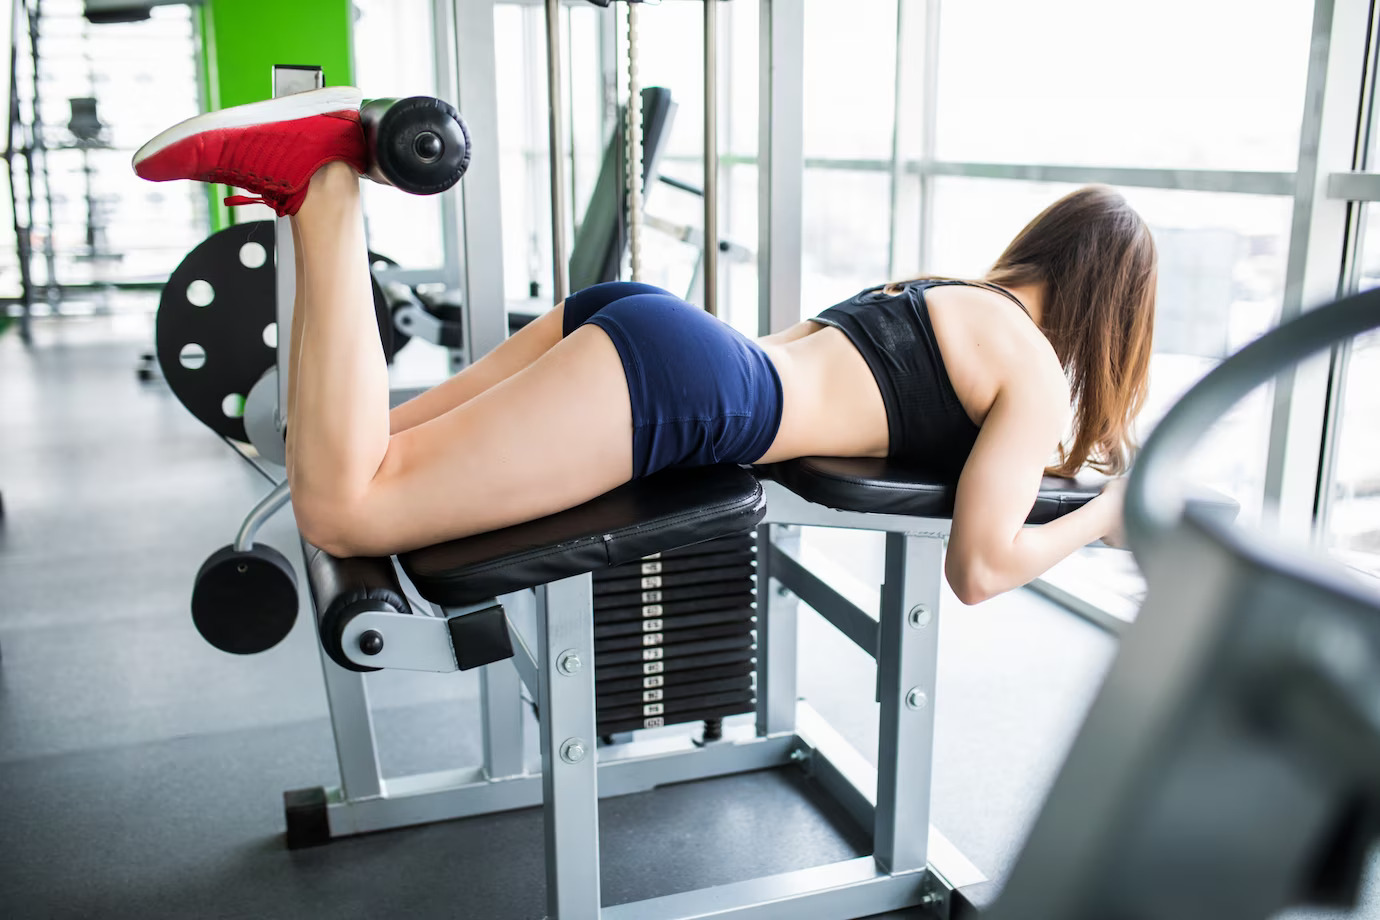
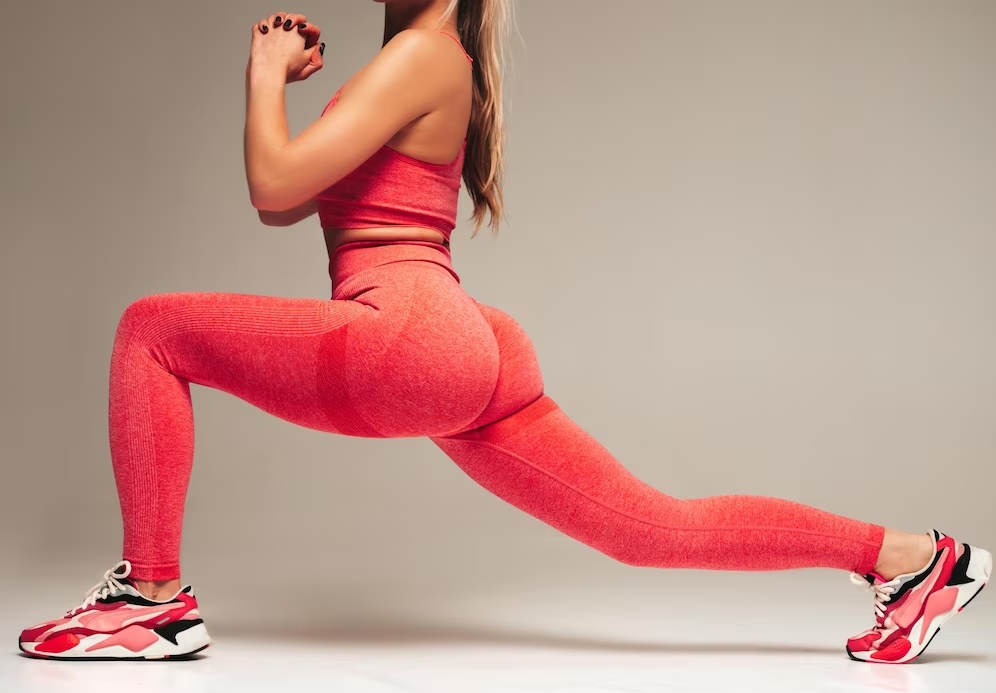
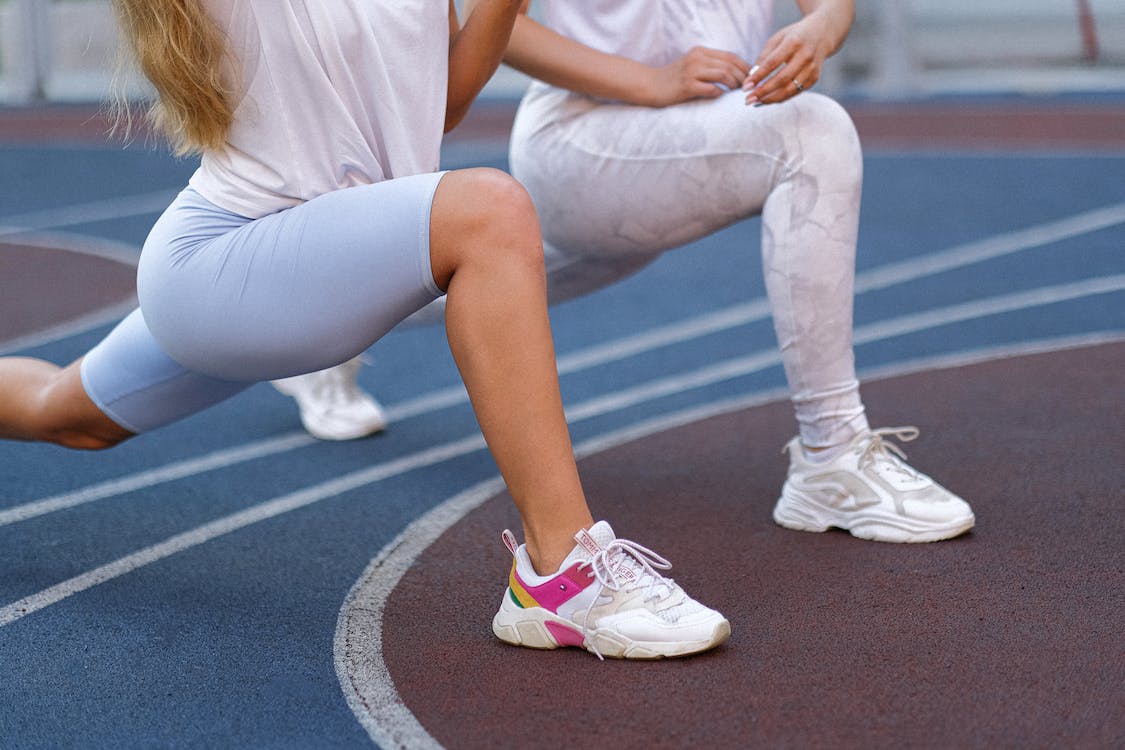
As an athlete, your body is your greatest asset, and maximizing your performance requires more than just strength and speed. One often overlooked aspect of athletic prowess is mobility – the ability to move freely and efficiently through a full range of motion. Whether you’re a professional athlete or a fitness enthusiast, incorporating mobility exercises into your training regimen can enhance your performance, prevent injuries, and promote overall well-being. In this blog post, we’ll dive into some of the best mobility exercises that athletes can incorporate into their routines. These exercises are designed to target key muscle groups, improve joint flexibility, and enhance overall athletic performance. So, let’s get off the ground: Most Effective Mobility Exercises For Athletes Listed below are some of the best mobility workouts for athletes that are certain to produce results: 1.      Spiderman Lunges Image Source Spiderman Lunges, also known as Spiderman Crawls, is a dynamic mobility exercise that targets the hips, thighs, and core muscles. They mimic the crawling movements of Spiderman, hence the name. Follow these steps to perform Spiderman Lunges correctly: Warm-Up Start with a brief warm-up to get your body ready for exercise. Perform some light cardio, such as jogging in place or jumping jacks, to increase your heart rate. Do some dynamic stretches for the hips, like leg swings and hip circles, to prepare the hip joints for the lunges. Starting Position Stand with your feet shoulder-width apart and your arms at your sides. Engage your core muscles to stabilize your spine. Perform the Lunge Take a step forward with your right foot, lunging into a regular forward lunge. Your right knee should be directly above your right ankle, forming a 90-degree angle. As you lunge forward, simultaneously bring your left hand down to the ground on the inside of your right foot. Keep your left leg extended behind you, with the toes pointing down, like the starting position of a crawling movement. Ensure your chest is lifted and your back is straight. Return to Starting Position Push through your right foot’s heel to bring your right leg back to the starting position. Simultaneously lift your left hand off the ground and return it to your side. Switch Sides Repeat the same sequence on the opposite side. Step forward with your left foot, lunge, and bring your right hand to the ground inside your left foot. Perform the required number of repetitions or continue alternating sides in a fluid motion. Breathing Inhale as you step forward into the lunge. Exhale as you return to the starting position. Pro Tips Engage your core: Keep your abdominal muscles engaged throughout the exercise to stabilize your spine and enhance the effectiveness of the movement. Maintain proper form: Ensure your front knee is aligned with your ankle and doesn’t go past your toes during the lunge to protect your knee joint. 2.      Cossack Squat Image Source The Cossack Squat is a powerful lower-body exercise for athletes that targets the hips, thighs, and groin while enhancing flexibility and balance. It is an excellent movement for building strength in the legs and improving mobility. Follow these steps to perform the Cossack Squat correctly: Warm-Up Begin with a warm-up to increase blood flow to your muscles. For a few minutes, Perform light cardio exercises like jogging or jumping jacks. Do dynamic stretches for the hips, such as leg swings and hip circles, to prepare for the squatting movement. Starting Position Stand with your feet much wider than shoulder-width apart. Toes should be pointing slightly outward. Keep your back straight, shoulders relaxed, and chest lifted. Extend your arms straight in front of you for balance. Perform the Cossack Squat Shift your weight to one side as you begin to bend that knee, lowering yourself into a deep squat on that side. Keep your other leg straight, with the foot flat on the ground and the toes pointing upward. Try to keep your extended foot’s heel on the ground as you squat down to ensure proper form. Lower your body as much as you can comfortably, but avoid going beyond a point where you feel strain or pain. Return to the Starting Position Push through the heel of the bent leg to rise back up to the starting position. As you return to the upright position, keep your back straight and your core engaged for stability. Switch Sides Repeat the same sequence on the opposite side, shifting your weight to the other leg and performing a squat on that side. Continue alternating sides for the desired number of repetitions or times. Pro Tips Gradually increase depth: Start with shallow squats and gradually work your way into deeper squats as your flexibility and strength improve. Use your arms for balance: Extend your arms in front of you or place your hands on your hips to help maintain balance during the squat. Mobility Workouts For Athletes Let’s take a look at some mobility exercises for athletes that will take your athletic performance to new heights: 3.      Pigeon Pose Image Source Pigeon Pose, also known as Eka Pada Rajakapotasana, is a great mobility workout for athletes that provides a deep stretch for the hips and thighs. It is essential to approach this pose with mindfulness and respect for your body’s limitations. Follow these steps to practice Pigeon Pose correctly: Preparation Find a comfortable yoga mat or a soft surface to practice on. Start with a warm-up to prepare your body for the pose. Perform some gentle stretches for the hips, thighs, and lower back. Starting Position Begin in a tabletop position with your hands and knees on the mat. Ensure your wrists are under your shoulders and knees under your hips. Slide your right knee forward, placing it behind your right wrist. The right foot should be positioned near your left wrist. Leg Positioning Extend your left leg straight back, keeping the hips squared to the front of the mat. Ensure your left thigh is parallel to the long edge of the

Read More »
Compound Leg Exercises

Power Up Your Lower Body With These 6 Must-Try Compound Leg Exercises

Is your leg workout feeling a bit lackluster? Are you dreading another round of squats and lunges just to get some semblance of definition in those gams? You’ve come to the right place. With these compound leg exercises, you’ll be able to redefine your workouts – and what better way than with some exercise that will bring out both strength AND definition at once?! As they say, two birds with one stone. So, strap on those bracelets of commitment and prepare yourself for an effective workout: Related Blogs: Compound Chest Exercises   Compound Leg Exercises At Home Do these compound leg exercises at home, and up your leg workout right away: 1.     Bulgarian Split Squat Image Source The Bulgarian Split Squat is a bodyweight compound leg workout that primarily targets the quads, hamstrings, and glutes. It also engages the stabilizer muscles in the core and lower body, improving balance and coordination. This exercise helps build unilateral leg strength, which can address muscular imbalances. Step-Wise Guide: Stand with one foot placed about two feet in front of the other. Rest the top of your rear foot on a bench or step. Keep your torso upright, engage your core, and maintain a neutral spine. Lower your body by bending your front knee and hip until your front thigh is parallel to the ground. Push through your front heel and return to the starting position. Repeat the movement on the other leg. Continue alternating legs for the desired number of repetitions. Mistakes to Avoid Avoid leaning too far forward or letting your front knee go past your toes, as this can strain your knee joint. Keep your torso upright throughout the movement, and maintain a controlled pace to maximize the exercise’s effectiveness. 2.     Walking Lunges Image Source Walking Lunges target the quadriceps, hamstrings, glutes, and calves and provide a superb lower-body workout overall. They enhance leg strength, balance, and coordination. This exercise also engages the abdominal muscles, thereby enhancing balance and proprioception. Step-Wise Guide: Stand tall with your feet hip-width apart. Take a step forward with your right leg, ensuring a comfortable stride length. Lower your body by bending your right knee and hip until your right thigh is parallel to the ground. Your left knee should nearly touch the floor. Push through your right heel and bring your left foot forward to meet your right foot. Repeat the movement, stepping forward with your left leg this time. Continue alternating legs and walking in a controlled manner for the desired distance or number of repetitions. Mistakes To Avoid Avoid allowing your front knee to collapse inward or extend excessively beyond your toes. Maintain an upright posture by engaging your core muscles for stability. Take measured steps and keep a steady cadence to avoid losing your balance or straining your joints. Related: Calisthenics Leg Exercise 3.     Heel Elevated Goblet Squat Image Source Elevating the heels emphasizes quadriceps engagement and can improve ankle and leg mobility. This exercise enhances lower body strength, stability, and overall squat mechanics. Step-Wise Guide: Stand with your feet shoulder-width apart, toes slightly angled outward. Hold a dumbbell or kettlebell close to your chest with your elbows pointing down. Place weight plates or a raised surface under your heels, elevating them slightly. Keep your chest up, engage your core, and maintain a neutral spine. Descend into a squat position by bending your knees, pushing your hips back, and keeping your torso upright. Lower yourself until your thighs are parallel to the ground or slightly below. Push through your heels, engage your glutes, and return to the starting position. Repeat the movement for the desired number of repetitions. Mistakes To Avoid Avoid leaning too far forward or letting your knees collapse inward during the squat. Keep your chest up and maintain a neutral spine. Focus on pushing through your heels and engaging your glutes throughout the movement. Start with lighter weights to ensure proper form and gradually increase the load as your strength and technique improve. Compound Leg Exercises For Mass These exercises will result in leg mass. Let’s do them now: 4.     Barbell Hip Thrust Image Source The Barbell Hip Thrust focuses on the glutes, legs, and hamstrings, encouraging muscle development and posterior chain strength. It’s one of the best compound leg exercises for mass that aids in enhancing hip extension and general lower body power. Additionally, because it puts less strain on the spine, this exercise may be helpful for people with lower back problems. Step-Wise Guide: Sit on the ground with your upper back against a bench. Place a barbell across your hips, ensuring it is stable and centered. Plant your feet firmly on the ground in front of you, hip-width apart. Drive through your heels, activate your glutes, and lift your hips off the ground. Squeeze your glutes at the top position and hold for a second. Lower your hips back down to the starting position. Repeat the movement for the desired number of repetitions. Mistakes To Avoid Avoid arching your lower back excessively, as it can lead to discomfort or injury. Maintain a neutral spine throughout the movement. Ensure your feet remain flat on the ground and engage your glutes fully at the top position to maximize the benefits. 5.     Leg Press Image Source  It is an effective exercise for building leg strength and muscle mass, particularly when using heavy loads. The Leg Press also allows for more controlled movement than squats, making it a suitable compound leg exercise for beginners or individuals with certain mobility limitations. Step-Wise Guide: Sit on a leg press machine with your back flat against the backrest. Place your feet shoulder-width apart on the footplate. Ensure your knees are aligned with your toes and pointing in the same direction. Release the safety handles and push the footplate away by extending your knees until your legs are straight. Slowly bend your knees and lower the footplate back down toward your body. Repeat the movement for the desired number of repetitions. Mistakes To

Read More »
Compound Glute Exercises

Ignite Your Booty Transformation With These Compound Glute Exercises 🔥🍑

Are you prepared to advance your lower body exercises? If you’re tired of endless hours spent on isolated glute exercises that yield minimal results, it’s time to explore the world of compound glute exercises. These powerhouse movements not only target your glutes but engage multiple muscle groups, providing a more efficient and effective way to build strength and sculpt your lower body. Whether you’re a fitness enthusiast, an athlete, or someone looking to enhance their overall physical performance, incorporating compound glute exercises into your routine can yield tremendous benefits. These workouts offer a holistic approach to glute training that can transform your physique and unleash your true strength potential: Related Blogs: Compound Back Exercises Compound Chest Exercises Compound Shoulder Exercises Best Compound Glute Exercises For Bigger Buttocks Let’s have a look at the compound glute workouts that are sure to bring muscle to your glutes: 1.        Weighted Lunges   Image Source Weighted lunges are an excellent compound glute exercise that targets multiple muscle groups, including the glutes, quads, and hamstrings. By holding dumbbells in each hand and taking alternating steps forward, the lunges engage these key lower-body muscles. This underbutt workout not only builds strength but also helps improve balance and stability as you work to maintain proper form and control throughout the movement. Step-Wise Guide: Stand with your feet hip-width apart and hold a dumbbell in each hand. Take a step forward with your right foot, keeping your upper body straight. Lower your body until your right thigh is parallel to the ground, with your right knee directly above your ankle. Push through your right heel to return to the starting position and repeat with the left leg. Mistakes To Avoid Avoid leaning too far forward, as it can put excessive strain on your knees. Ensure proper form by keeping your chest lifted and your core engaged throughout the movement. Advantages Works glutes, quads, hamstrings for complete lower body workout. Challenges balance and stability. Disadvantages:  Can be hard on the knees if not done properly. Use caution if you have knee issues. 2.      Sumo Squat   Image Source The sumo squat is a compound exercise that targets multiple muscle groups, providing an effective workout for the glutes, inner thighs, and quads. This glute isolation workout not only helps build lower body strength but also contributes to enhanced hip mobility. By consistently incorporating sumo squats into your fitness routine, you can strengthen and tone your glutes, inner thighs, and quads while reaping the benefits of improved lower body strength and increased hip mobility. Step-Wise Guide: Stand with your feet wider than shoulder-width apart, toes pointing out at a 45-degree angle. Hold a dumbbell or kettlebell with both hands in front of your body. Lower your body by bending your knees and pushing your hips back, keeping your chest upright. Descend until your thighs are parallel to the ground, then push through your heels to return to the starting position. Mistakes To Avoid Avoid letting your knees collapse inward during the squat. Keep your knees in line with your toes and maintain proper alignment throughout the movement. Advantages Targets inner thighs, glutes, quads. Improves hip mobility. Disadvantages Can be challenging for those with tight hips/poor mobility. 3.      Barbell Hip Thrusts   Image Source Barbell hip thrusts have to be on your list of top compound exercises for glutes as they activate and strengthen them. Moreover, it also works several important muscle groups, including hamstrings, and lower back. By incorporating this exercise into your routine, you can enhance posterior chain strength and power, leading to improved athletic performance and overall functional fitness. With consistent practice and attention to proper form, barbell hip thrusts can be an effective tool in strengthening your glutes, hamstrings, and lower back while enhancing posterior chain strength and power. Step-Wise Guide: Sit on the ground with your back against a bench or elevated platform. Place a barbell across your hips. Bend your knees and position your feet flat on the floor, hip-width apart. Brace your core and drive through your heels, pushing your hips up until your thighs are parallel to the ground. Squeeze your glutes at the top, then lower your hips back down, maintaining control. Mistakes To Avoid: Avoid overarching your lower back at the top of the movement. Focus on maintaining a neutral spine throughout the exercise. Ensure that your weight is evenly distributed across your feet. Advantages: Targets glutes, hamstrings, lower back. Builds posterior chain strength. Can use heavy loads. Disadvantages: Set up can be cumbersome/awkward. Requires barbell. 4.       Frog Kicks   Image Source This targeted exercise routine focuses on engaging and strengthening the glutes, outer thighs, and core, offering numerous benefits such as enhanced glute activation and improved hip mobility. By incorporating specific movements and techniques, this compound glute workout effectively targets these areas to promote muscle activation and development. The glutes, which are comprised of three major muscles, are specifically targeted to enhance their strength and shape. Step-Wise Guide: Start by getting down on your hands and knees, with your wrists aligned with your shoulders and knees below your hips. Extend your right leg straight back, keeping it parallel to the ground. Bend your right knee and bring it out to the side, aiming to touch your right foot to your right glute. Extend your right leg back out and repeat the movement for the desired number of repetitions before switching sides. Mistakes To Avoid: Avoid overarching your lower back or sagging your hips during the movement. Keep your core engaged and maintain stability throughout. Advantages: Targets glutes, thighs and core stability. Works on hip mobility. No equipment required. Disadvantages : Balance can be challenging. Must maintain core/spine neutrality. 5.       Step-Up   Image Source To improve lower body strength, stability, and balance, try this exercise programme that concentrates on the glutes, quadriceps, and hamstrings. People can get a complete lower-body workout by concentrating on these specific muscle groups. Step-Wise Guide:

Read More »
Compound Chest Exercises

6 Compound Chest Exercises For A Sculpted & Toned Upper Body

When it comes to chest workouts, most of us immediately think of the standard bench press or dumbbell fly. While these exercises have their merits, it’s time to take your chest training to the next level. Compound exercises target multiple muscle groups simultaneously, allowing you to work smarter, not harder. By engaging the chest, shoulders, and triceps together, these exercises give you a comprehensive upper-body workout that yields remarkable results. So, get ready to ignite your chest muscles, challenge your strength, and elevate your fitness game. This blog post’ll guide you through some of the most effective compound chest exercises. Whether you’re a beginner or a seasoned gym-goer, there’s something here for everyone. Let’s get going: Related Blog: Compound Back Exercises Compound Chest Exercises At Home These at-home compound chest workouts are sure to help you build chiseled chest: 1.     Deficit Push-Ups Image Source The muscles in your chest, shoulders, and triceps all get a workout when you do deficit push-ups. The elevated position enhances the range of motion, making chest development more difficult and effective. Additionally, it’s a bodyweight compound chest exercise that also improves shoulder stability and upper body strength. Step-Wise Guide Place your hands on raised surfaces, such as blocks or steps, with your body in a push-up position. Position your hands slightly wider than shoulder-width apart. Lower your chest towards the ground by bending your elbows, keeping your body straight. Push yourself back up to the starting position by extending your arms fully. Repeat for the desired number of repetitions. Pro Tips Maintain a straight line from your head to your heels throughout the exercise. Engage your core and squeeze your glutes to keep your body stable. If the exercise is too difficult, start with a shallower deficit or perform regular push-ups until you build enough strength. 2.     Dumbbell Pullover Image Source Dumbbell pullovers are one of the finest compound chest dumbbell exercises that primarily target the chest muscles but also engage the lats, shoulders, and triceps. They help develop upper body strength, increase chest and shoulder flexibility, and improve overall posture. This exercise can enhance the appearance and size of the chest while promoting a strong mind-muscle connection. Step-Wise Guide Lie on a flat bench with your head and upper back supported. Hold a dumbbell with both hands, palms facing up, and extend your arms straight above your chest. Lower the dumbbell in an arc behind your head, maintaining a slight bend in your elbows. When you feel a stretch in your chest and shoulders, bring the dumbbell back up to the starting position. Repeat for the desired number of repetitions. Pro Tips Keep your core engaged and slightly bend your elbows throughout the movement. Avoid excessive arching of the lower back. Focus on feeling the stretch in your chest and shoulders, and control the weight to avoid swinging or jerking motions. 3.     Dumbbell Fly Image Source Dumbbell fly exercises generally target the chest muscles, notably the pectoralis major (outside chest). They also work the shoulders and the triceps. Dumbbell flies assist in isolating the chest muscles, increase the range of motion, and improve the definition of chest muscles. They work effectively to shape a well-rounded and contoured chest. Step-Wise Guide Lie on a flat bench with a dumbbell in each hand. Start with your arms extended above your chest, palms facing each other. Lower the dumbbells out to the sides in a wide arc, keeping a slight bend in your elbows. When you feel a stretch in your chest, bring the dumbbells back up to the starting position by squeezing your chest muscles. Repeat for the desired number of repetitions. Pro Tips Maintain a slight bend in your elbows throughout the movement to avoid excessive strain on the joint. Focus on contracting your chest muscles and maintaining control over the weights. Avoid using excessively heavy weights that may compromise proper form and increase the risk of injury. Best Compound Chest Exercises List This list of best compound chest exercises will produce the results you are after: 4.     Barbell Bench Press Image Source The barbell bench press has to be on your list of compound chest workouts as it primarily targets the chest muscles (pectoralis major and minor) and also works the shoulders and triceps. It helps increase upper body strength, muscle mass, and overall power. This is a staple exercise for building a strong and well-defined chest. Step-Wise Guide Lie down flat on a bench and put your feet firmly on the floor. Hold the load with your hands just a little wider than shoulder-width apart. Take the barbell off the rack and hold it straight above your chest with your arms fully extended. Bring the barbell down to your chest by bending your elbows 45 degrees and keeping them bent. When the barbell hits your chest, take a short break. Extend your arms fully and push the barbell back up to the starting position. Repeat for the appropriate number of repetitions. Pro Tips Keep your back flat on the bench throughout the exercise and avoid excessive arching or lifting your hips off the bench. It’s important to perform the Barbell Bench Press with controlled movements throughout the entire range of motion. Avoid bouncing the bar off your chest or using momentum to lift the weight. 5.     Chest Press Machine Image Source The chest press machine also works the chest muscles, shoulders, and triceps. It provides a controlled and stable movement, making it a suitable compound chest exercise for beginners or those with limited stability. It helps strengthen the chest muscles and can be used for building muscle endurance or as part of a rehabilitation program. Step-Wise Guide Adjust the seat height so that the handles are at chest level. Sit with your back against the backrest and grip the handles with your palms facing forward. Push the handles away from your chest by extending your arms fully. Slowly bring the handles back towards your chest while maintaining control. Pause briefly when the

Read More »
Underbutt-Exercises

6 Underbutt Exercises To Lift, Tone, & Flaunt Your Best Rear View

Are you frustrated with your flat, sagging backside? No matter how many squats you do, you just can’t get that rounded, lifted look. The problem isn’t your squat form – it’s that you’re not working the underbutt! This overlooked area is the real secret to perky, high glutes. And it only takes a few simple exercises to transform your tush. Finally, get the tight toned booty of your dreams with these 6 best underbutt exercises. They’ll activate and lift those stubborn underbutt muscles for irresistible cheeks that defy gravity. Underbutt Isolation Exercises Target and tone the underbutt muscles with these isolation exercises designed to zero in on the often neglected underside of the glutes. Isolating the underbutt will lift, firm, and transform your booty. 1.     Bulgarian Split Squat   Image Source Consider using Bulgarian split squats in your exercise regimen if you’re looking for a quick way to tone your underbutt. It targets the calves, hamstrings, quadriceps, and glutes. Additionally, this exercise helps increase single-leg strength and balance while also enhancing lower body stability and strength. How To Do It? Starting from a standing position, place one foot forward and the other on a sturdy bench or stage behind you. Lower your body by bending your front knee and keeping your back leg straight and stretched. Your front thigh should be parallel to the ground or just a touch lower as you descend. Aim to keep your knee from crossing your toes. Return to your starting point by pushing through your front heel. Do the exercise until you reach the number of times you want to do it, then switch sides. Pro Tips Start with a lower platform or bench and gradually increase the height as you get comfortable. Maintain an upright posture throughout the exercise. To avoid placing undue strain on the front knee, keep it in line with the ankle. Control the movement and focus on engaging the muscles throughout the exercise. 2.     Reverse Lunge   Image Source Hit your underbutt from different angles with the reverse lunge. Turning around for this variation enables you to better target the muscles on the bottom of your butt. The reverse lunge enhances mobility while working the underbutt from an angle that many exercises miss. This builds shapely, balanced glutes from top to bottom. How To Do It? Stand tall with your feet hip-width apart. With one foot, take a stride backward, landing on the ball of your foot and bending your body into a lunge. Make sure your rear knee is slightly off the ground and your front knee is in line with your ankle. By pressing through your front heel, you can get back to your starting posture. Before swapping sides, perform the exercise as many times as you’d like. Pro Tips Step back far enough for both knees to form a 90-degree angle. Keep the front knee aligned with the ankle to prevent stress on the knee joint. Avoid slouching forward and maintain a straight posture. To get back to the starting position, press through the front heel. 3.     Banded Kickback Image Source  Fire up the gluteus minimus for a lifted, toned underbutt. This small muscle lies beneath the glutes and is key for sculpting a pert rear. The banded kickback allows you to isolate it for serious toning and firming. Adding resistance with a booty band also helps to build strength in the oft-neglected underbutt region. This clever exercise specifically targets the gluteus minimus. Additionally, it improves hip stability and extension. How To Do It? Start by standing with your feet hip-width apart and wrapping a resistance band around your legs. To aid in maintaining your balance, place your hands on a sturdy object like a chair or a wall. Keep your back straight the entire time by using your core. Lift the second leg off the ground while keeping it straight and shift your weight to that leg. Just a little knee flexion is required. Keep control and concentrate on tightening your hips as you kick your raised leg straight back behind you. Hold your foot still. Take a short break when your leg is fully extended at the top of the movement. Without letting your leg touch the ground, return to the starting position. Before transferring to the other leg, perform the exercise for the required amount of repetitions. Pro Tips Utilise a resistance band that offers adequate tension while enabling controlled movement. Keep your core active and stand up straight. At the peak of the exercise, concentrate on tightening the glutes. Avoid swinging the leg and maintain control throughout the exercise. Best Underbutt Exercises At Home Sculpt your underbutt without any equipment with these effective at-home moves. Toning your tush has never been simpler with these easy yet hard-hitting underbutt exercises. No gym required! Just your own bodyweight is enough to firm, tighten, and lift your rear. 4.     Glute Bridge   Image Source One of the best underbutt exercises for engaging and enlarging the gluteal muscles is the glute bridge. It engages the hamstrings, core, and lower back muscles.Activate and strengthen your entire posterior chain including the underbutt with the humble glute bridge. This basic exercise packs a toning, firming punch when done properly. How To Do It? Your feet should be roughly hip-width apart as you lay on your back with your knees bent and flat on the ground. To aid in balance, place your arms flat on the floor adjacent to your torso. Squeeze your hips and contract your core. Your knees and shoulders should be straight as you press through your feet and push your hips off the ground. Take a moment to pause at the peak and make sure your glutes are squeezed tightly. Return your hips to their starting position slowly. Repeat the exercise as many times as necessary. Pro Tips To maximise glute activation, squeeze them at the peak of the exercise. Engage your core and keep your spine neutral to prevent arching your lower back. Push

Read More »
Compound Shoulder Exercises

6 Must-Try Compound Shoulder Exercises For Massive Strength & Size

When it comes to building strong, well-rounded shoulders, incorporating compound exercises into your workout routine is essential. These exercises target multiple muscle groups simultaneously, helping you develop strength, stability, and overall functional fitness. Whether you’re an experienced weightlifter or just starting your fitness journey, compound shoulder exercises can take your shoulder training to the next level. So, let’s explore some of the best compound shoulder workouts that will help you achieve your fitness goals: Related Blogs:  Compound Back Exercises Calisthenics Shoulder Exercises Compound Shoulder Workouts For Mass Listed below are the best compound should exercises that will result in substantial mass: 1.     Seated Dumbbell Press   The seated dumbbell press is one of the best compound shoulder workouts that primarily targets the deltoid muscles (all heads) and the triceps and upper chest muscles to a lesser extent. Start by sitting on a sturdy bench with a backrest that supports your lower back. Hold a dumbbell in each hand, resting them on your thighs. Choose a weight that is appropriate for your strength and fitness level. With a firm grip on the dumbbells, use your legs to help raise the weights up to shoulder level. This will be your starting position. Ensure that your feet are firmly planted on the ground, shoulder-width apart, and your back is pressed against the backrest. Maintain a neutral spine and engage your core for stability throughout the exercise. As you exhale, push the dumbbells upward by extending your arms, making sure to keep them slightly bent at the elbow. Continue pushing the weights until your arms are fully extended but not locked out. The dumbbells should be in line with your ears or slightly higher. Pause briefly at the top of the movement to squeeze your shoulder muscles. Inhale as you slowly lower the dumbbells back to the starting position, maintaining control and avoiding any sudden or jerky movements. Pro Tips Keep your back firmly against the bench to maintain stability. Maintain a neutral wrist position throughout the movement and avoid excessive lower back arching. Use a controlled tempo and avoid using momentum to lift the weights. 2.     Pike Push-Ups Pike push-ups are among the top compound shoulder workouts that target the shoulders, particularly the anterior (front) deltoids, and engage the triceps and upper chest muscles. Start in a push-up position with your hands slightly wider than shoulder-width apart and your feet hip-width apart. Walk your feet toward your hands, lifting your hips up into an inverted V position. Bend your elbows and lower your head toward the ground, keeping your body in a straight line. Push back up to the starting position. Pro Tips Maintain a stable core throughout the exercise and avoid letting your lower back sag. Start with a modified version by performing the exercise with your hands elevated on a stable surface, such as a bench or step, to reduce the difficulty. 3.     Dumbbell Shoulder Press If you are looking for a fantastic compound workout to build dream shoulders, consider adding a dumbbell shoulder press to your routine. It works the deltoid muscles (all heads) as the primary movers and the triceps and upper chest muscles as secondary stabilizers. Stand upright with your feet shoulder-width apart, or sit on a sturdy bench with a backrest that supports your lower back. Hold a dumbbell in each hand at shoulder level, palms facing forward. This is your starting position. Engage your core muscles and maintain a straight posture throughout the exercise. Exhale and press the dumbbells upward, extending your arms fully. Keep a slight bend in your elbows to avoid locking them out. As you lift, focus on pushing the dumbbells directly overhead, avoiding any forward or backward movement. Keep your wrists straight and aligned with your forearms. Once the dumbbells are overhead, pause for a moment, squeezing your shoulder muscles at the top of the movement. Inhale and slowly lower the dumbbells back to the starting position, maintaining control and avoiding any sudden or jerky movements. Pro Tips Engage your core and maintain a slight bend in your knees for stability. Avoid leaning back excessively as you press the dumbbells upward. Focus on a controlled movement and avoid locking your elbows at the top of the movement. Compound Shoulder Exercises For Strength Lets’ take a look at the top exercises that will build shoulder strength like never before: 4.     Arnold Press The Arnold press targets the deltoid muscles (all heads) and engages the triceps, upper chest, and upper back muscles to a lesser extent. The rotation involved adds an extra challenge and recruits additional stabilizer muscles. Start by holding a pair of dumbbells at shoulder level with your palms facing your body. Rotate your palms away from your body as you press the dumbbells overhead. At the top of the movement, your palms should be facing forward. Reverse the motion by rotating your palms back toward your body as you lower the dumbbells to shoulder level. Pro Tips Maintain good posture throughout the exercise, keeping your core engaged and avoiding excessive leaning. Start with lighter weights to focus on proper form and gradually increase the load as you become more comfortable with the movement. 5.     T-Bar Rows The rhomboids, latissimus dorsi, and trapezius are the primary muscles worked in T-Bar rows. In addition, they work the muscles of the lower back, biceps, and rear deltoids. Position a barbell in a landmine attachment or secure it in a corner. Stand with your feet shoulder-width apart, knees slightly bent, and grip the bar with an overhand grip. Hinge forward from the hips, keeping your back straight, and let the bar hang in front of you. Pull the bar toward your chest by retracting your shoulder blades, keeping your elbows close to your body. Squeeze your back muscles at the top of the movement. Lower the barbell back down with control, fully extending your arms. Pro Tips Maintain a neutral spine throughout the exercise and avoid rounding your back. Keep your elbows close to

Read More »
Sexual Benefits Of Bananas

The Surprising Sexual Benefits Of Bananas For Men & Women: Boost Your Libido Naturally

While bananas are widely known for their nutritional value and delicious taste, they also offer numerous advantages when it comes to enhancing sexual health and experiences. Packed with essential nutrients, vitamins, and minerals, bananas can have a positive impact on both men and women. In this article, we will enter into the exciting world of the sexual benefits of bananas for men and women. So, let’s peel back the layers and discover why this fruit deserves a place in your bedroom routine: Sexual Benefits of Bananas for Men Image Source Let’s take a look at the sexual banana benefits for men that are too good to be true: 1.     Increased Libido Bananas contain bromelain, an enzyme known for its aphrodisiac properties. Bromelain can enhance libido and sexual desire by increasing the production of testosterone, the primary male sex hormone. Adequate testosterone levels are crucial for a healthy sex drive in men. 2.     Improved Blood Flow One of the many reasons men should eat bananas is that they are rich in potassium, a mineral vital in maintaining healthy blood pressure levels. By keeping blood pressure in check, bananas help ensure proper blood flow throughout the body, including the genital area. This improved blood circulation can contribute to stronger and longer-lasting erections. 3.     Enhanced Stamina Bananas are an excellent source of carbohydrates, the body’s primary energy source. The natural sugars found in bananas provide a quick energy boost, helping men maintain endurance during sexual activities. This increased stamina can lead to longer and more satisfying sexual experiences. 4.     Mood Enhancement Another sexual benefit of eating bananas regularly is that they contain tryptophan, an amino acid that gets converted into serotonin in the brain. Serotonin is often referred to as the “feel-good” hormone as it helps regulate mood and promote a sense of well-being. By consuming bananas, men can experience an uplifted mood and reduced stress levels, creating a positive mindset for enjoyable sexual encounters. 5.     Increased Sperm Production Bananas are a rich source of essential vitamins and minerals that support healthy sperm production. Vitamin C, present in abundance in bananas, helps protect sperm from oxidative damage and improves their motility. Magnesium and zinc, also found in bananas, are crucial for sperm production, ensuring optimal reproductive health in men. 6.     Improved Cardiovascular Health The high fiber content in bananas, particularly soluble fiber, can help lower cholesterol levels in the body. By maintaining healthy cholesterol levels, bananas contribute to better cardiovascular health, reducing the risk of conditions such as atherosclerosis. Good cardiovascular health is essential for proper blood flow to the penis, aiding in achieving and maintaining erections. Sexual Benefits of Bananas for Women Image Source Unsure of what sexual benefits bananas bring for women? Let’s get to the bottom: 1.     Enhanced Lubrication Adequate vaginal lubrication is vital for comfortable and pleasurable sexual intercourse. Bananas contain water-soluble vitamins like vitamin C and B6, which contribute to maintaining proper hydration levels in the body. Optimal hydration supports the natural lubrication of the vaginal tissues, making sexual activities more enjoyable for women. 2.     Increased Sexual Desire Vitamin B6, found abundantly in bananas, plays a crucial role in regulating hormone production. This vitamin is involved in the synthesis of neurotransmitters that affect mood and sexual desire, such as serotonin and dopamine. By eating bananas, women can help balance hormone levels and potentially experience an increase in sexual desire. 3.     Improved Orgasmic Response Bananas are rich in potassium, an essential mineral that aids in muscle contractions. During sexual activity, potassium contributes to the contraction of pelvic floor muscles, which play a role in achieving orgasms. Regular consumption of bananas can potentially lead to stronger and more intense orgasms for women, and that’s one of the most admired sexual advantages of bananas for ladies. 4.     Regulated Menstrual Cycle Vitamin B6, present in bananas, has been shown to help regulate hormone levels and support a healthy menstrual cycle. This vitamin assists in balancing estrogen and progesterone, which are key hormones involved in menstruation. By promoting hormonal balance, bananas can help alleviate menstrual cramps and discomfort, allowing women to have a more enjoyable sexual experience. 5.     Reduced Stress and Anxiety Bananas are known for their natural sugars and carbohydrates, providing quick and sustained energy. Additionally, bananas contain vitamin B6, which is involved in the synthesis of neurotransmitters like serotonin and dopamine, known for their mood-regulating properties. Banana consumption can help women feel less stressed and anxious, which promotes a calmer frame of mind and increases their openness to sexual experiences. 6.     Improved Energy Levels Last but not least, bananas are an excellent source of carbohydrates, which are the body’s primary fuel source. The natural sugars found in bananas, such as glucose, fructose, and sucrose, provide a quick energy boost, while the dietary fiber in bananas ensures a steady release of energy. This sustained energy can help combat fatigue and increase endurance during sexual activities, leading to more satisfying and pleasurable experiences for women. Final Verdict As we wrap up our exploration of the sexual benefits of bananas, it’s evident that this humble fruit has much to offer to enhance our sexual well-being. Whether it’s boosting libido, improving blood flow, increasing stamina, enhancing lubrication, or supporting reproductive health, bananas prove to be a natural ally for a fulfilling sex life. You can reap the rewards of their nutrient-rich profile by incorporating bananas into a balanced diet alongside other healthy lifestyle choices. So, go ahead and make bananas a delicious and nutritious addition to your sexual wellness journey. FAQs How does banana help sexually? Bananas can help improve sexual health in several ways. They contain nutrients like bromelain, which can enhance libido and increase testosterone levels in men. Bananas also provide potassium, which promotes proper blood flow to the genitals, supporting stronger erections in men and enhanced lubrication in women. What does banana do to the male body? Bananas offer various benefits to the male body. They provide essential nutrients like potassium, which helps maintain healthy blood pressure and improve cardiovascular health.

Read More »

6 Best Calisthenics Arm Exercises To Have Chiseled Arms

When it comes to building strong and defined arms, calisthenics provides an excellent foundation. These bodyweight exercises target the major muscle groups in your arms and engage various supporting muscles to enhance overall upper body strength. This blog post will discuss the top six calisthenics arm exercises, explaining how to perform each exercise correctly, the benefits they offer, and the common mistakes to avoid. Whether you’re a beginner or an experienced fitness enthusiast, incorporating these exercises into your routine will help you achieve impressive arm strength and aesthetics. So, let’s get going and discover the power of calisthenics for your arms: Related Blogs: Calisthenics Leg Exercises Calisthenics Shoulder Exercises Calisthenics Arm Workout No Equipment Don’t you have any equipment, still you want to develop heavy arms? No worries, and let’s do it with calisthenics no equipment arm exercises: 1.     Diamond Push-Up Image Source How To Do It? Start in a high plank position with your hands close together, forming a diamond shape with your thumbs and index fingers, directly below your chest. Extend your legs straight out behind you, balancing on your toes, and engage your core muscles to maintain a straight line from your head to your heels. Lower your body towards the ground by bending your elbows, keeping them close to your sides, and maintaining the diamond shape with your hands. Continue lowering until your chest or chin lightly touches the diamond shape created by your hands. Push yourself back up to the starting position by fully extending your arms, while maintaining control and tension in your muscles. Benefits Diamond push-ups work the triceps brachii muscles, making them an excellent workout for increasing arm strength and definition. They also work the pectoralis major, deltoids, and core muscles, increasing upper body strength. Mistakes To Avoid Avoid allowing your lower back to sag or your hips to hike up during the movement. Maintain a straight line from your head to your heels throughout this calisthenics no equipment arm workout. Also, ensure your elbows are tracking along your body rather than flaring out to the sides. 2.     Chin-Up Image Source How To Do It? Find a sturdy pull-up bar and grip it with an underhand grip (palms facing towards you), hands slightly wider than shoulder-width apart. Hang from the bar with your arms fully extended, engaging your shoulder blades by pulling them down and back. Begin the movement by bending your elbows and driving them down towards your hips, pulling your body up towards the bar. Continue pulling until your chin is above the bar, focusing on squeezing your shoulder blades together and maintaining tension in your back muscles. Slowly lower yourself back down to the starting position, fully extending your arms. Benefits Chin-ups are a complex calisthenics arm exercise that mainly works the latissimus dorsi and biceps brachii muscles on the front of the arms. They also give the upper body a complete exercise by working the forearm, shoulder, and core muscles. Mistakes To Avoid Avoid using excessive swinging or momentum to complete the movement. Focus on controlled and deliberate contractions of the target muscles throughout the exercise. Also, be mindful of not shrugging your shoulders up towards your ears, and maintain a straight body position without excessive arching or swinging. 3.     Bear Crawl Image Source How To Do It? Start on your hands and knees, with your hands directly under your shoulders and your knees under your hips. Lift your knees a few inches off the ground, slightly bending your hips and knees. Crawl forward by moving your opposite hand and foot simultaneously, maintaining a stable core and a steady rhythm. Continue alternating your opposite hand and foot, moving forward for a desired distance or time. Benefits Bear crawls engage multiple muscles in the arms, shoulders, and core. They improve overall arm strength, endurance, and stability. Additionally, bear crawls are amongst the top calisthenics arm workouts for intermediates and advanced help to enhance coordination and promote full-body engagement. Mistakes To Avoid Avoid allowing your back to sag or your hips to rise too high during the crawl. Maintain a strong and stable core throughout the movement. Remember to keep your hands under your shoulders and maintain a controlled pace. Top Calisthenics Arm Exercises Let’s have a look at some great calisthenics arm workouts that are sure to up your arm game: 4.     Overhead Triceps Extensions Image Source How To Do It? Stand or sit upright with a dumbbell or any weighted object in one or both hands, depending on your preference and available equipment. Raise the weight(s) overhead, extending your arms fully. Keep your upper arms close to your head and perpendicular to the floor. Bend your elbows, slowly lowering the weight(s) behind your head. Pause briefly when your forearms are parallel to the ground. Extend your arms back to the starting position by straightening your elbows. Benefits Triceps brachii are the primary muscle group worked in overhead triceps extensions, and they are responsible for increasing upper-arm strength and size. During the workout, they also activate the shoulders and core for stability. Mistakes To Avoid Avoid arching your back or leaning too far forward during the movement. Ensure that your elbows stay in a fixed position throughout the exercise, pointing straight up towards the ceiling. Avoid letting the weight(s) swing or lose control. 5.     Bench Dips Image Source How To Do It? Sit on the edge of a sturdy bench or chair, placing your hands shoulder-width apart on the edge of the bench, fingers facing forward. Extend your legs out in front of you, heels resting on the ground, and keep your feet hip-width apart. Slide your buttocks off the bench, supporting your body weight with your hands and arms. Lower your body by bending your elbows and allowing your shoulder blades to retract until your upper arms are parallel to the ground. Pause briefly, then push yourself back up by straightening your arms, while keeping your back close to the bench. Benefits Bench dips is one of

Read More »
Calisthenics Leg Exercises

7 Calisthenics Leg Exercises To Elevate Your Leg Game From Ordinary To Extraordinary

Are you ready to take your leg workouts up a notch? Are you looking for new exercises that will challenge your lower body and help build strength? Look no further than calisthenics! With its combination of dynamic moves and isometric holds, calisthenics can help tone your legs like never before. So, get ready to experience some serious burn with these cream-of-the-crop calisthenics leg exercises: Related Blog: Calisthenics Shoulder Exercises Calisthenics Leg Workout No Equipment For Beginners Listed below are the top calisthenics leg exercises you can do at home: 1.     Wall Sit Image Source Wall sits is one of the beginner-level calisthenics leg exercises that primarily target the quadriceps (the muscles on the front of your thighs), but they also engage the glutes, hamstrings, and calves. This exercise helps to strengthen and tone the lower body, improve muscular endurance, and enhance stability and balance. Step-Wise Guide Find a wall and stand with your back to it, with your feet shoulder-width apart. Slowly lower your body by bending your knees, as if you were sitting on a chair. Throughout the exercise, keep your back flat on the wall. Lower yourself until your thighs are parallel to the ground or your knees are at a 90-degree angle. It is critical to keep this position for the specified amount of time. Pull your belly button towards your spine to engage your core muscles, and keep your weight in your heels. Maintain proper posture by keeping your back straight and your shoulders from rounding. Tips: Start with shorter durations and gradually increase the time as you build strength. It can be helpful to set a timer or use a stopwatch to track your progress. Remember to breathe steadily throughout the exercise. Mistakes to avoid: Avoid letting your knees extend beyond your toes, as this can strain your knees unnecessarily. Additionally, avoid arching your lower back or letting it come off the wall, as this can compromise your form. 2.     Standard Squat Image Source Standard squats are a compound exercise that targets multiple muscle groups simultaneously, including the quadriceps, hamstrings, glutes, and calves. They are amongst the easiest calisthenics leg workout that helps to build lower body strength, increases muscle mass, improves balance and coordination, and enhances functional movement patterns. Squats also have the potential to boost your metabolism and aid in fat loss due to their high energy expenditure. Step-Wise Guide Begin by standing with your feet shoulder-width apart, or slightly wider if you want. Pull your belly button towards your spine to engage your core, and keep your chest elevated throughout the workout. Begin the action by bending your knees and lowering your torso, as if you were sitting back in a chair. Aim for your thighs to be parallel to the ground or your knees to be at a 90-degree angle. Lower yourself by pulling your hips back and keeping your weight in your heels. Push through your heels to return to the starting position once you’ve reached the desired depth. Tips: Maintain proper form by keeping your back straight, avoiding rounding your shoulders, and ensuring that your knees stay in line with your toes throughout the movement. It can be helpful to pick a spot on the wall in front of you and focus on it to maintain balance. Mistakes to avoid: Avoid letting your knees collapse inward, as this can strain the knee joint. Additionally, refrain from arching your lower back or leaning too far forward. Calisthenics Leg Exercises For Intermediates If you are a beginner who is eager to get started with leg calisthenics, here are a couple of workouts to add to your routine: 3.     Glute Bridge Image Source It helps to strengthen and tone the glutes, improve hip stability, and enhance overall lower body strength. The glute bridge can also aid in improving posture and reducing lower back pain. The glute bridge targets the glutes and hamstrings, while also engaging the core and lower back muscles. Step-Wise Guide Begin by lying flat on your back with your knees bent and your feet hip-width apart on the ground. Put your arms at your sides, palms down. Engage your abs and press through your heels to lift your hips off the ground, forming a straight line from your knees to your shoulders. Squeeze your glutes at the peak for a second, then slowly descend your hips back to the beginning position. Repeat until the desired number of repetitions has been reached. Tips: Focus on driving through your heels and maintaining a neutral spine throughout the exercise. Avoid arching your lower back excessively. Mistakes to avoid: Do not push your hips too high, as this can strain your lower back. Also, avoid letting your knees collapse inward or flare out to the sides. 4.     Pistol Squat Image Source Pistol squats are a challenging calisthenics leg exercise for mass that works the quads, hamstrings, glutes, and core muscles. They help to improve leg strength, balance, stability, and single-leg coordination. Pistol squats also require greater flexibility and mobility in the hips and ankles. Step-Wise Guide Begin by standing with your feet shoulder-width apart, then lift and stretch one foot forward. For balance, extend your arms in front of you. Lower your body down on the supporting leg while extending your other leg forward, keeping your back straight and chest up. Descend until your supporting leg is 90 degrees off the ground and your extended leg is parallel to the ground. To return to the beginning position, push through your heel. Rep with the opposite leg. Tips: Start with a modified version by holding onto a stable object for balance. As you progress, you can gradually increase the range of motion and challenge yourself to perform the pistol squat without assistance. Mistakes to avoid: Avoid leaning too far forward or inward, and ensure that your knee tracks in line with your toes to maintain proper alignment. 5.     Glute Kickback Image Source Glute kickbacks work the glutes, specifically the gluteus maximus. They help

Read More »
Skincare routine after 40s

Age Gracefully: Expert-Approved Skincare Routine For Women Over 40

Welcome, fabulous 40-somethings, to a skincare journey that will make your skin sing with joy. Are you ready to discover the secrets to maintaining a youthful, radiant complexion in your 40s? Of course, you are! After all, who wouldn’t want their skin to look as stunning as they feel? We know you’re passionate about skincare, and we’re here to satisfy your thirst for knowledge with an engaging and comprehensive guide regarding “Skincare routine to follow after 40s”. So, let’s embark on this adventure together and unveil the ultimate skincare routine that will have your skin thanking you profusely: Best skincare routine in and after your 40s Here are some skincare tips to follow in your 40s to have glowing and radiant skin: 1. Cleanse Your Skin Thoroughly Image Source Cleanse your skin twice a day, morning and night, using a gentle yet effective cleanser. This step is crucial to remove dirt, oil, and impurities accumulated throughout the day. Opt for a cleanser suitable for your skin type, whether it’s dry, oily, or combination. Gently massage the cleanser onto your skin in circular motions for at least 60 seconds, focusing on areas prone to congestion or makeup buildup. Rinse it off with lukewarm water to reveal a clean canvas for the rest of your routine. 2. Use A Gentle Exfoliator Exfoliation is key for rejuvenating your skin and promoting a youthful glow. Our skin’s natural exfoliation process slows down as we age, leading to a dull complexion. Incorporate a gentle exfoliator into your routine 2-3 times a week to remove dead skin cells, unclog pores, and improve skin texture. Look for exfoliators containing AHAs (alpha hydroxy acids) or BHAs (beta hydroxy acids) like glycolic acid or salicylic acid in order to take care of your skin after 40s. These ingredients provide effective yet gentle exfoliation, revealing fresher, brighter skin. 3. Apply A Moisturizer With Anti-Aging Properties Image Source In your 40s, hydration becomes even more vital to maintain skin elasticity and suppleness. Choose a moisturizer specifically formulated for mature skin that includes ingredients like hyaluronic acid, peptides, or ceramides. These ingredients help replenish moisture, reduce the appearance of fine lines and wrinkles, and enhance your skin’s overall firmness. Apply your moisturizer twice a day, after cleansing and toning, using upward strokes to promote better absorption and stimulate circulation. 4. Use A Serum To Target Specific Skin Concerns Serums are potent allies in your skincare arsenal. They contain a high concentration of active ingredients that penetrate deep into the skin, addressing specific concerns such as hyperpigmentation, uneven skin tone, or sagging. Depending on your skin’s needs, look for serums containing ingredients like vitamin C, niacinamide, hyaluronic acid, or peptides. Apply a few drops of serum after cleansing and toning, gently pressing it into your skin to enhance absorption. Using a suitable serum is probably one of the finest ways of caring for your skin in your 40s and beyond. 5. Incorporate A Retinol Or Retinoid Into Your Routine Retinols and retinoids are renowned for their remarkable anti-aging properties. These vitamin A derivatives help stimulate collagen production, reduce the appearance of wrinkles, and improve skin texture. Start by introducing a low-concentration retinol product into your routine, initially using it a few times a week, gradually increasing frequency as your skin adapts. Apply it at night after cleansing and toning. Begin with a pea-sized amount and gently massage it into your skin. Allow your skin to fully absorb the product before proceeding with the rest of your nighttime routine. It’s important to note that retinol products may cause initial dryness or sensitivity, so it’s advisable to follow up with a moisturizer to keep your skin hydrated and nourished. 6. Protect Your Skin From Sun Damage With SPF Image Source Sun protection is a non-negotiable step at any age, but it becomes increasingly crucial if you are in search of the best skincare routine to follow after your 40s. Invest in a broad-spectrum sunscreen with a minimum SPF of 30 to shield your skin from harmful UV rays. Apply it generously to all exposed areas of your face, neck, and any other areas exposed to the sun, even on cloudy days, to prevent premature aging, sunspots, and skin discoloration. Reapply every two hours or more frequently if sweating or swimming. 7. Include Antioxidants In Your Skincare Regimen Antioxidants play a vital role in neutralizing free radicals and protecting your skin in and after 40s against environmental damage. Look for skincare products infused with antioxidants like vitamin C, vitamin E, green tea extract, or resveratrol. These ingredients help combat oxidative stress, promote a youthful complexion, and enhance overall skin health. Incorporate an antioxidant-rich serum or moisturizer into your routine, applying it after cleansing and toning to reap the maximum benefits of these powerful ingredients. 8. Hydrate Your Skin From Within By Drinking Plenty Of Water Image Source Healthy skin starts from within, so remember to hydrate your body adequately if you are wondering what skincare routine you should follow in your 40s. Drinking enough water throughout the day helps flush out toxins, maintain skin elasticity, and promote a natural, youthful glow. Aim for at least eight glasses of water daily, and consider incorporating hydrating foods into your diet, such as fruits and vegetables with high water content. This simple step will support your skincare routine and contribute to your overall well-being. 9. Get Enough Sleep To Promote Skin Rejuvenation Quality sleep is essential for your skin’s rejuvenation process. During deep sleep, your body repairs and regenerates cells, including those in your skin. Aim for 7-8 hours of uninterrupted sleep each night to allow your skin to undergo its natural healing and renewal process. Establish a consistent bedtime routine, create a sleep-friendly environment, and prioritize relaxation techniques to improve your sleep quality and wake up with refreshed, glowing skin. 10. Consult With A Dermatologist Image Source While this comprehensive skincare routine after 40s provides a strong foundation, it’s essential to remember that everyone’s skin is unique.

Read More »
Scroll to Top