Blogs

back and bicep dumbbell workout

5 best back and bicep dumbbell workout

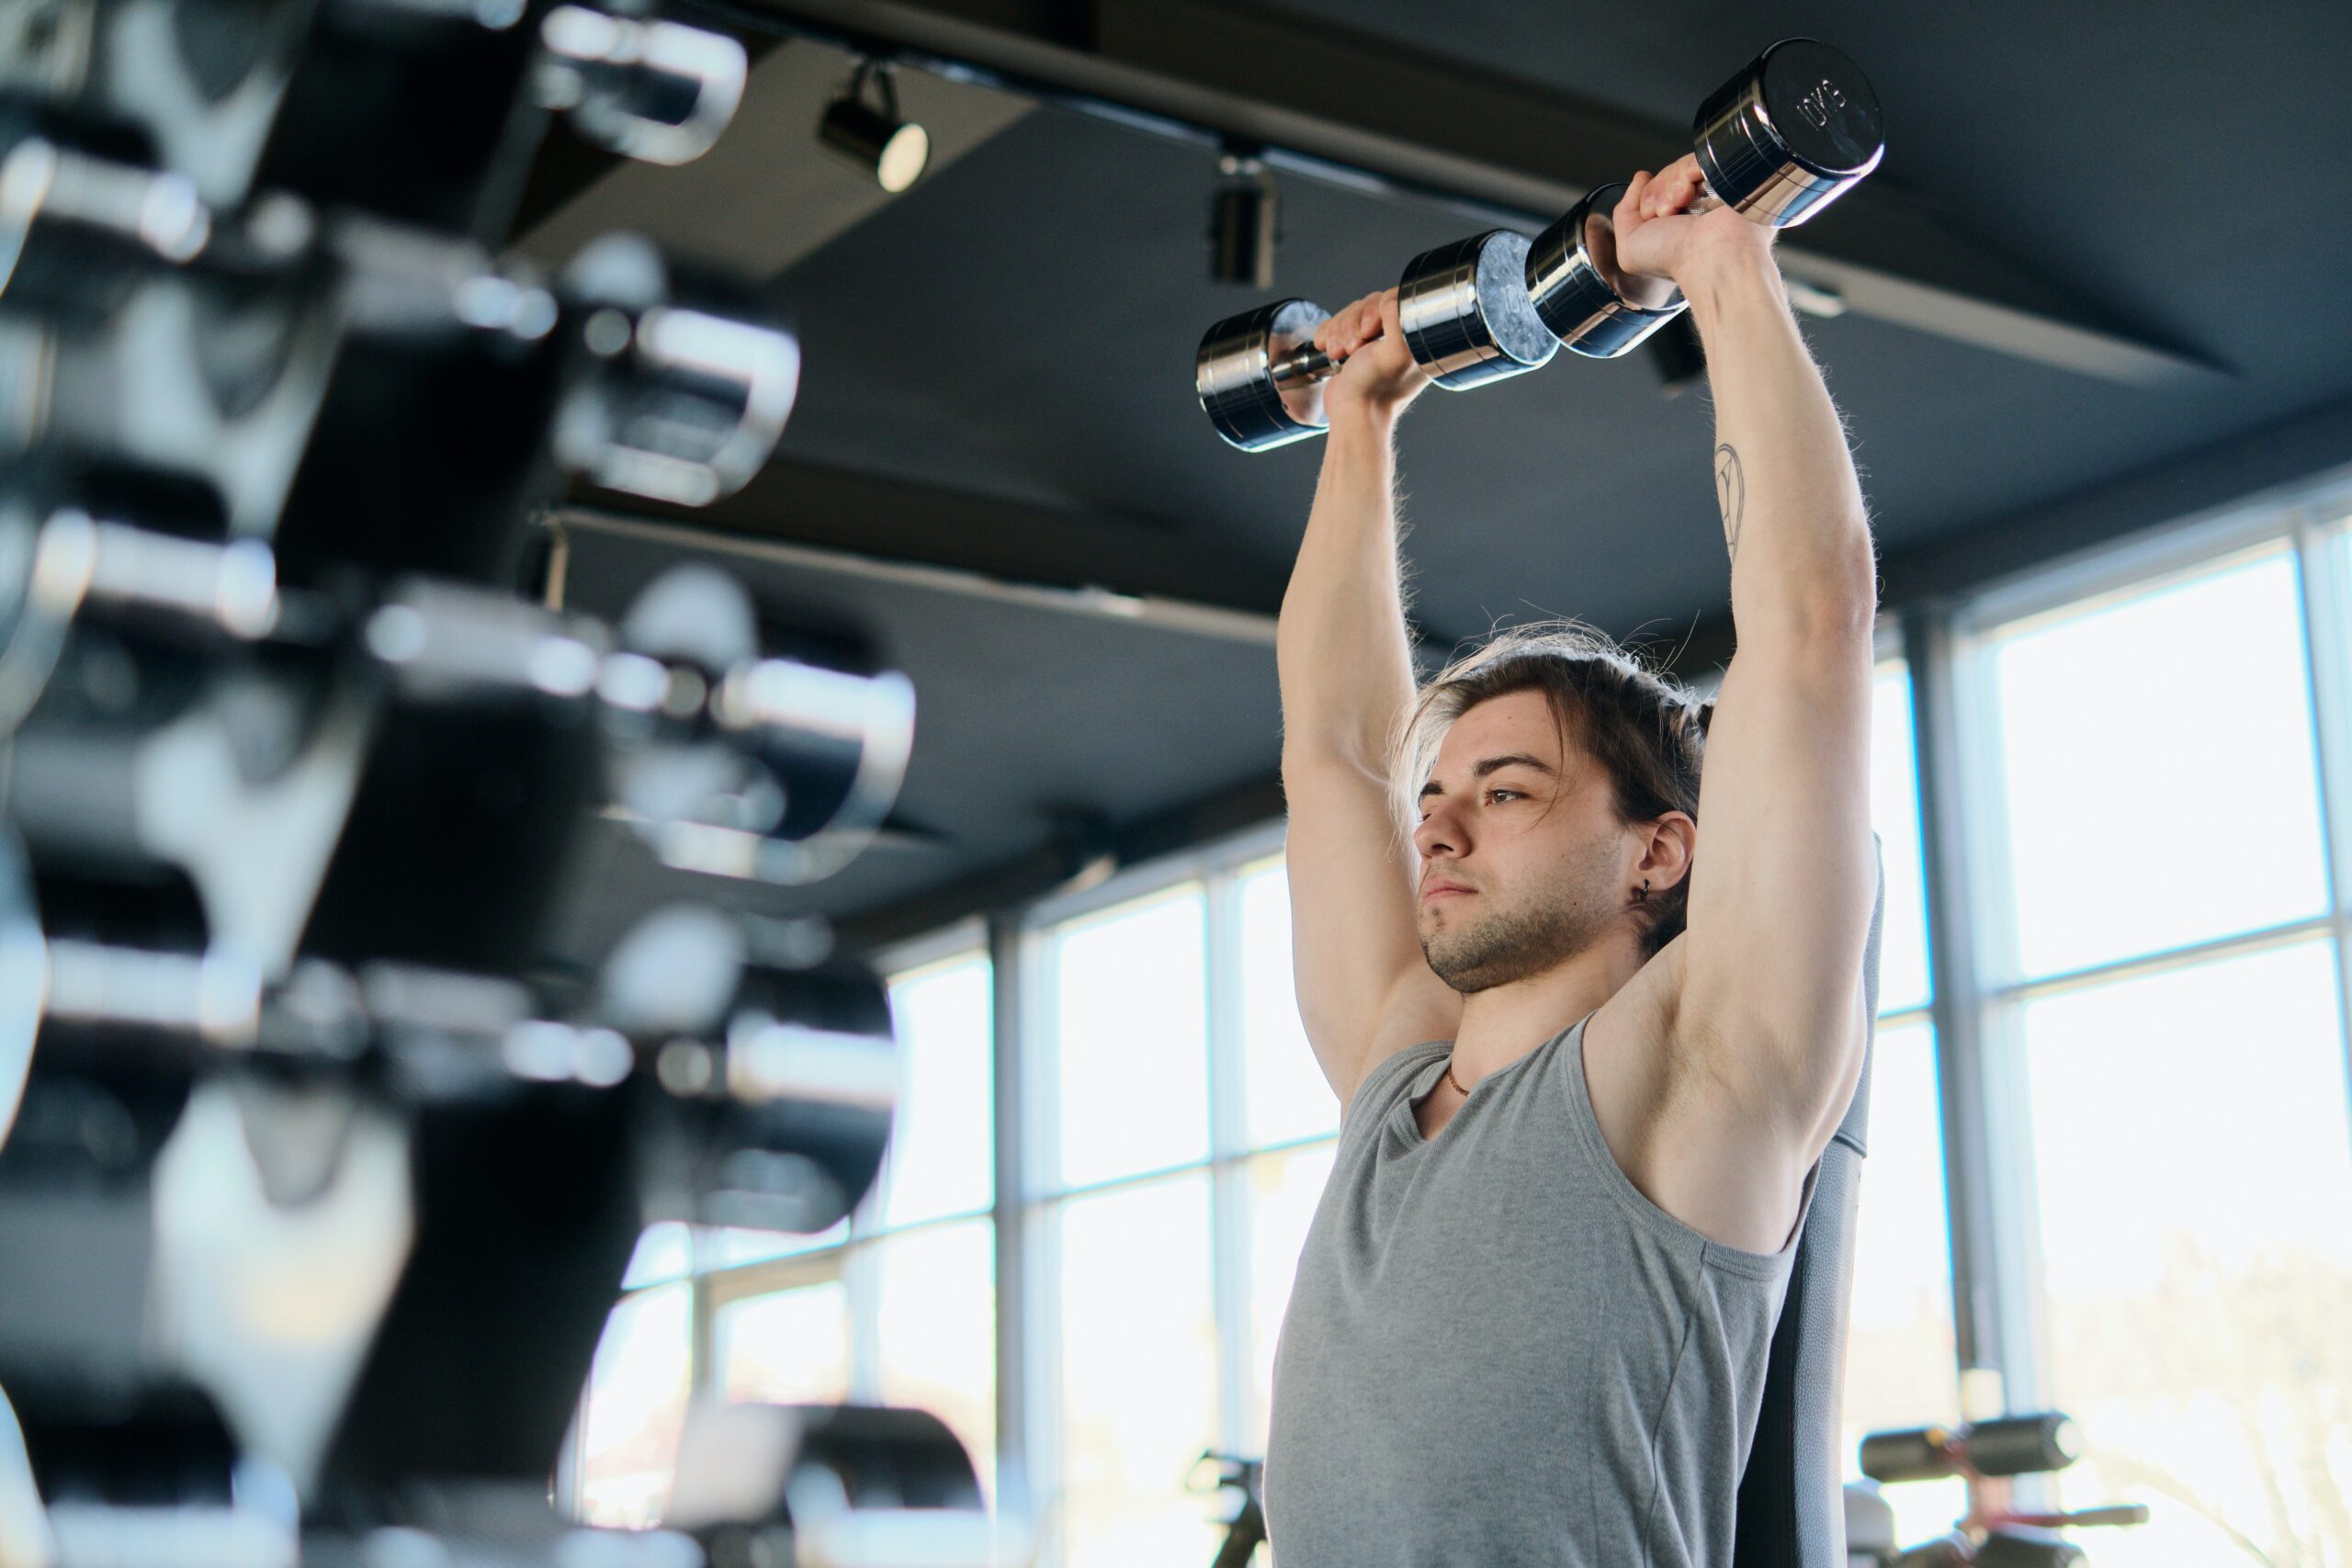
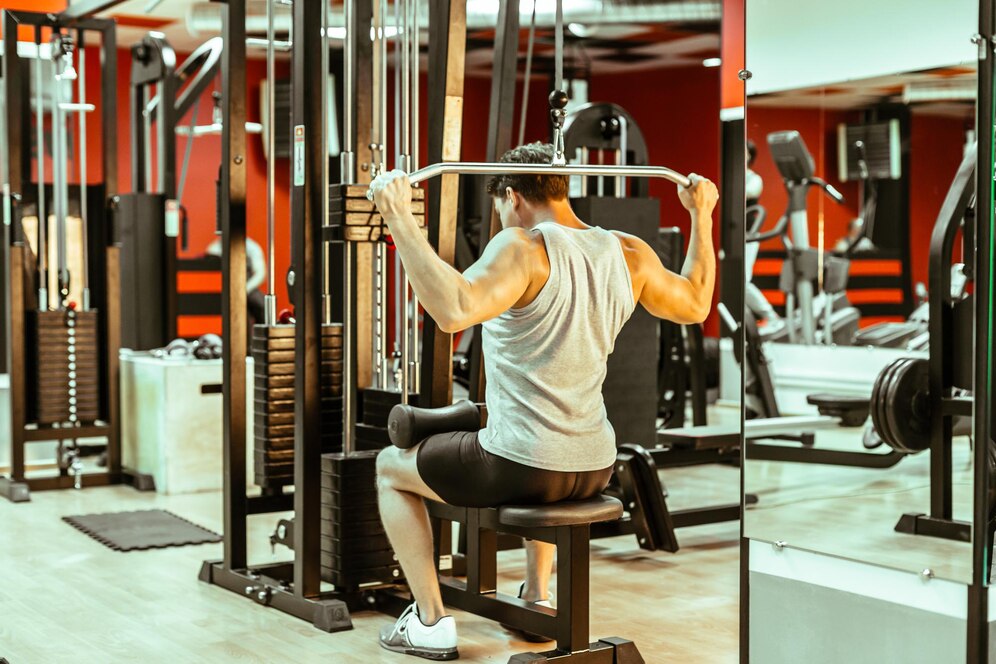
Introduction :   A back and bicep dumbbell workout means Preparing the back and biceps in a workout and is a famous preparation strategy utilized by novices to cutting-edge muscle heads. What’s more, the benefit of this exercise is that you train free muscle gathering. Reciprocal muscles are at least two different muscle bunches engaged with specific activity developments. For instance, the lat pulldown works the back and bicep muscles all the while. Subsequently, preparing these muscle bunches in a similar exercise checks out. Along these lines, your muscles get additional opportunities to recuperate while you’re preparing contradicting muscle bunches like chest and rear arm muscles. You’ve most likely known about push days and pull days. A back and bicep exercise resembles a forced day, with the exception that you need to work the back more straightforwardly. So, this exercise is optional for a conventional push-pull split.    The benefits of back and Bicep dumbbell workout   The back and Bicep Dumbbell Workout gives various benefits to our body to stay aware of  well-being. For example, First, it manufactures significant solid areas for a conspicuous chest region, which chips away at the two styles and positions. Zeroing in on the back muscles chips away at everyday sufficiency, and position diminishes the bet of injury and lightens back torture. Additionally, biceps parts help with making changed solid areas for and. Hand loads offer versatility, allowing you to adjust the power and extent of development.  Uniting supersets assemble the efficiency of the activity, helping you while propelling muscle advancement. Other than the way that this exercise maintains extended strength and steadiness, it similarly deals with everyday execution, making it a huge extension of any well-being plan.   Warm-Up :    A warm-up, for the most part, comprises a slow expansion in power in active work, joint versatility exercise, and extending, trailed by the movement. For instance, competitors could gradually run to warm their muscles and increase their pulse before running or playing an escalated sport. Warm-ups must be well-defined for the action so the muscles to be utilized are actuated. The dangers and advantages of consolidating extending with heating up are debatable, although it is for the most part trusted that heating up readies the competitor both intellectually and genuinely.   How beneficial is Warm-Up for our body?   Warm-up builds your pulse and, accordingly, your bloodstream. This empowers more oxygen to arrive at your muscles. A warm-up likewise enacts and makes preparations between your nerves and muscles, which works on the proficiency of development. What are the five importance of warm-up?   Injury Anticipation: Warm-ups increment blood stream to muscles, hoisting their temperature. This makes muscles and connective tissues more adaptable and less inclined to injury. It additionally considers better oxygen conveyance, lessening the gamble of muscle strains and injuries. Further developed Muscle Execution: When muscles are warm, they contract all the more productively and effectively. This improves strength and power yield during exercises, prompting more compelling instructional courses. Upgraded Scope of Movement: Warm-ups increment joint grease and lessen solidness. This superior joint versatility considers a more prominent scope of movement in works out, which is crucial for legitimate structure and diminishing the gamble of joint wounds. Mental Arrangement: Warm-ups give a potential chance to get ready for the impending activity meeting intellectually. They assist with centering the psyche, increment readiness, and lift inspiration, guaranteeing a more useful exercise. Progressive Pulse Increment: Warm-ups, bit by bit, raise the pulse and set up the cardiovascular framework for more difficult action. This lessens the weight on the heart and forestalls unexpected spikes in circulatory strain, making exercises more secure for the heart.   Back Exercises :    Lie on your back with your knees twisted and your feet level on the floor. Keep your shoulders and head loosened up on the floor, and fix the muscles in your tummy and hindquarters. Then, raise your hips to frame a straight line from your knees to your shoulders. Attempt to remain as adequate as to take three full breaths. Return to where you began and rehash. Start by completing five reiterations every day and gradually stir up to 30. How beneficial are Back Exercises for our body?   Back exercises offer critical advantages for the body. Fortifying the back muscles, including the upper and lower back, advances further developed poses, diminishing the gamble of back torment and postural issues. These activities likewise upgrade useful strength, making everyday exercises simpler and diminishing the probability of injury. Moreover, a solid back gives center help, supporting spinal steadiness and diminishing the gamble of lower back torment. At last, well-developed back muscles add to stylishly satisfying physical make-up, improving, generally speaking, body piece and appearance. Integrating back practices into your wellness routine is fundamental for both well-being and style. Five Best Back Exercises  Bent-over row :    The bent-over row is a compound back exercise where you twist at the hips, keeping your back straight, and lift a hand weight or free weights towards your lower chest while pressing your shoulder bones together. This development focuses on the upper back, especially the latissimus dorsi, rhomboids, and traps, and connects with the biceps and lower arms. It successfully develops chest area fortitude, further developing stance, and advancing muscle development toward the back and arms. Legitimate structure is essential to forestall injury and expand results. Inverted row :    The inverted row is a practice in exercises. It works the muscles of the upper back — the trapezius and latissimus dorsi — as well as the biceps as an optional muscle bunch. The recumbent line is regularly done in three to five sets, yet redundancies rely upon the sort of preparation a lifter is utilizing to make their expected increases. This exercise is lighter on the joints contrasted with weighted lines. The activity can likewise be performed with blended, underhand, or overhand holds with either wide or limited hand position. The activity is additionally referred to under different names like

Read More »
Best Pull Exercises With Dumbbells

7 best pull exercises with dumbbells

Introduction :  Best pull exercises with dumbbells mean A full scope of exercise center gear isn’t generally useful or even accessible – making a dumbbell possibly pull exercise very helpful whenever performed appropriately. Luckily, practically every activity with a dumbbell is likewise conceivable with a dumbbell, permitting home-rec center proprietors or lifters with a solid irregularity to receive the rewards of free weight exercises, no surprises. Most dumbbell pull exercises focus on the back and biceps muscles of the body, as a rule, including the exerciser making counter-obstruction towards themselves instead of away from them. Benefits of Pull Exercises with Dumbbells   Best pull exercises with dumbbells offer a few critical advantages for general wellness and strength improvement. Right off the bat, they focus on the muscles of the chest area, especially the back, biceps, and shoulders. This further develops stance and equilibrium by reinforcing the muscles answerable for pulling developments. Furthermore, best pull exercises with dumbbells draw in stabilizer muscles, upgrading joint steadiness and lessening the injury gamble. They additionally advance muscle evenness and improvement, as each side of the body works autonomously. Also, dumbbell pull exercises are flexible and can be adjusted to different wellness levels. They can be effectively changed by changing the weight, redundancy, and strategy to suit individual necessities and objectives. At long last, these activities can be acted in various conditions, making them available for home exercises or rec center meetings. Integrating maneuver practices with hand weights into your routine can add to a balanced workout schedule, advancing strength, balance, and practical chest area strength. Seven best pull exercises with dumbbells   Bent-Over Dumbbell Rows   Bent-over dumbbell rows are a compound strength-preparing exercise fundamentally focusing on the muscles in your upper back, including the latissimus dorsi and rhomboids, as well as the biceps and lower back. To play out this activity, stand with feet shoulder-width separated, holding a free weight in each hand, palms confronting your middle.  Twist at the midriff until your chest area is lined up with the ground, keeping your knees marginally bowed. With a nonpartisan spine, withdraw your shoulder bones and pull the dumbbells towards your lower ribcage, pressing your back muscles. Lower the loads down with control. This exercise works on back strength, stance, and, by and large, chest area improvement. Tips and Tricks: Bent-over dumbbell Rows, keep a level back, draw in the center, and withdraw the shoulder bones. Utilize controlled developments, breathing out while lifting and breathing in while bringing down the loads. Begin with a weight you can deal with serenely and steadily increment it. Keep elbows near the body, focusing on the mid-back muscles for greatest viability. Single-Arm Dumbbell Rows   The dumbbell row, or the single-arm dumbbell row, is one of those activities that will remain in style. It’s basic to do — you stoop on a seat and line your arm to your side — and it requires only a hand weight to stack the development. It’s likewise a one-sided workout, which simultaneously trains one side of your body. Single-arm moves help to level out strong lopsided characteristics and consume more calories after some time since you’re multiplying your responsibilities. Tips and Tricks: Single-arm dumbbell Rows” are an incredible back workout. Keep a level back, connect with your center, and withdraw your shoulder bone. Begin with a reasonable weight. Pull the free weight toward your hip, keeping your elbow near your body. Crush your back muscles at the top. Substitute arms for equilibrium and strength. Dumbbell Pull-Ups   Pull-ups are one of the hardest moves to dominate. They require chest area strength (explicitly from your back muscles and shoulders), control, and mental strength. To assist you with arriving at your objective of figuring out how to do pull-ups, I made an aide of moves you ought to begin doing to develop a chest area fortitude establishment. The dumbbell exercises will assist you with developing chest area fortitude; you should likewise keep doing other chest area works, similar to push-ups and rear arm muscle expansions. The draw-up varieties will assist you with getting comfortable with the development example and separate each part of a draw-up. Assuming you’re feeling enticed to do this multitude of activities together in one exercise, don’t; you’ll be very sore if you do. All things being equal, integrate these activities into your solidarity programs. You can add them to a chest area exercise with pushing developments, similar to push-ups and the seat press, and you can likewise add them to body exercises with pushing works, similar to crouch and lurches. Tips and Tricks: Dumbbell Pull-Ups, using a hand weight between your feet, uplift standard pull-ups. Hold the hand weight securely. Stay aware of extraordinary design, pull in your middle, and pull your facial structure over the bar. Progressively lower yourself with control. Start with reasonable weight and add bit by bit. This assortment gathers remarkable chest region and handle strength. Dumbbell Pull-Overs   Dumbbell Pullovers are a profoundly compelling chest area practice for the chest, back, and rear arm muscles. To play out this activity, lie level on a seat with your upper back and shoulders upheld and your feet fixed solidly on the floor. Hold a free weight with two hands over your chest, arms marginally twisted. Bring down the hand weight in reverse in a controlled movement  while keeping your center drawn in and keeping a slight curve in your elbows. Feel the stretch in your chest and lats, then, at that point, pull the load back up to the beginning position. Hand weight Pullovers are an extraordinary expansion to your daily gym practice for developing grit and improving general chest area definition. Tips and Tricks: Dumbbell Pullovers are powerful for lats and chests. Lie on a seat, hips somewhat beneath shoulders. Keep a slight curve in your elbows. Bring down the dumbbell in reverse, feeling a stretch, then pull it back up. Keep a steady center and controlled development. Begin with a lighter load to

Read More »

Amp Up Your Shoulder Workout With These 5 Best Side Delt Exercises

Are you looking for an effective way to work out your side deltoid muscle? If so, then you’ve come to the right place. Your goal may be to build muscle and size in your shoulders or maybe even just add definition; whatever it is, these side delt exercises are sure to help. Not only can they give shape and strength training benefits but also added stability and posture improvements. You’ll find there’s no better way to get those coveted V-shaped upper body muscles than through strong side delts. So what are you waiting for? Read on, and let’s start getting that back going today with these side delt exercises: Best Side Delt Exercises For Mass Listed below are some of the best side delt workouts you can do at home with minimal equipment: 1.      Seated Arnold Press Image Source The Seated Arnold Press is a versatile shoulder exercise that engages the side deltoids, front deltoids, and triceps. By pressing the dumbbells overhead with a rotational movement, it significantly emphasises the side delts, helping to create a broader and more defined shoulder appearance. This exercise also improves shoulder stability and mobility while allowing for a full range of motion. Muscles Targeted: Side delts, front delts, triceps How To Perform? Sit on a sturdy bench with a backrest, or use an adjustable weight bench with back support. Place your feet flat on the ground and maintain an upright posture. Hold a dumbbell in each hand at shoulder height, with your palms facing your body (neutral grip). Your elbows should be bent at a 90-degree angle. Start with the dumbbells near your chest. Press them upward and outward while rotating your palms to face forward as you extend your arms. Continue to press the dumbbells overhead until your arms are fully extended but not locked out. Slowly reverse the movement, bringing the dumbbells back to the starting position while rotating your palms back to a neutral grip. Perform 3-4 sets of 8-12 reps with controlled movements. 2.      One-Arm Cable Raise Image Source The One-Arm Cable Raise is an excellent isolation exercise for the side deltoids. By lifting the cable handle laterally against resistance, it directly targets and strengthens these muscles. The benefit of using a cable machine is that it provides constant tension throughout the entire range of motion, resulting in better muscle engagement and development. Muscles Targeted: Side delts How To Perform? Attach a single-hand cable handle to a low pulley machine and set the desired weight. Stand with your side to the cable machine and grab the handle with your far hand (the hand farthest from the machine). Your near hand should be placed on your hip. Stand with a slight bend in your knees and maintain a straight back. Keeping your arm mostly straight (with a slight bend at the elbow), lift the cable handle upward and outward to the side until your arm is parallel to the ground. Hold the contraction for a moment, feeling the tension in your side delt. Slowly lower the handle back to the starting position. Complete 3-4 sets of 10-15 reps on each side. 3.      Seated Behind-The-Neck Press While Seated Behind-The-Neck Press primarily works the front deltoids, it also engages the side deltoids to a significant extent. This compound side delt exercise helps in developing overall shoulder strength and size, contributing to a balanced and aesthetic shoulder profile. However, it’s crucial to perform this exercise with proper form to avoid any unnecessary strain on the shoulder joints. Muscles Targeted: Side delts, front delts, triceps How To Perform? Sit on a bench with a backrest and set up a barbell in a squat rack at about shoulder height. Grip the barbell slightly wider than shoulder-width apart with a pronated (palms facing forward) grip. Unrack the barbell and lower it behind your neck. Ensure that your back is straight, and your chest is up. Press the barbell upward until your arms are fully extended but not locked out. Lower the barbell back down to behind your neck with control. Perform 3-4 sets of 6-10 reps with proper form. 4.      Dumbbell Lateral Raise Image Source The Dumbbell Lateral Raise is one of the most effective side exercises with dumbbells for directly targeting them. It allows you to isolate and work on this muscle group, resulting in better lateral shoulder development. By lifting the dumbbells to shoulder level or slightly higher, you can enhance the width of your shoulders, creating a more V-shaped upper body appearance. Muscles Targeted: Side delts How To Perform? Stand upright with a dumbbell in each hand at your sides. Keep your feet hip-width apart and a slight bend in your knees. Maintain a slight bend in your elbows throughout the exercise. Slowly raise both dumbbells out to the sides until they are at shoulder level or slightly higher. Keep your palms facing downward during the movement. Hold the top position for a brief moment to feel the contraction in your side deltoids. Lower the dumbbells back down to your sides in a controlled manner. Aim for 3-4 sets of 12-15 reps with controlled motions. 5.      Side Plank Image Source While primarily known as a core-strengthening exercise, the Side Plank also engages the side deltoids. This no-equipment side delt exercise helps stabilize the shoulder girdle and improves shoulder endurance, making it an essential component for overall shoulder health. Strong side deltoids assist in maintaining proper posture and shoulder stability during daily activities and other workouts. Muscles Targeted: Side delts, obliques, core How To Perform? Lie on your side on a mat or the floor with your legs straight and stacked on top of each other. Prop your upper body up on your elbow, which should be directly under your shoulder. Keep your body in a straight line from head to heels, engaging your core muscles to maintain stability. Lift your hips off the ground, creating a straight line from your feet to your shoulders. Hold this position for as long as you can

Read More »

Lift Your Fitness Game: Top Upper Lat Exercises For A Stronger Back

Are you looking for ways to build strength and tone up your upper body? Do you find shoulders, arms, and back exercises intimidating or hard to stick with? Then upper lat exercises are the perfect way to help you reach all your fitness goals. Upper lat exercises involve a range of strength-building movements targeting specific muscles in the shoulder, arm, and back area. Not only do these workouts help increase strength and definition, they also improve posture by encouraging correct alignment of the spine while building muscle stability throughout the entire core. With a little dedication and consistency when it comes to following an effective upper lat exercise program – no matter if you’re just starting out or training as a competitive athlete–you will see real results in no time at all: Best Upper Lat Exercises & Workouts Let’s get to know about the most ingenious workouts specifically targeted for upper lats: 1.     Lat Pulldowns Image Source Lat pulldowns are a fundamental exercise for building a strong and well-defined upper back. By targeting the latissimus dorsi muscles, they help create that desirable V-shape in your physique. Additionally, this upper lat exercise aids in improving grip strength, enhancing posture, and promoting better shoulder stability. Lat pulldowns can be customized by adjusting the weight and grip width, making them suitable for individuals of varying fitness levels. Equipment Needed: Lat pulldown machine. How to do it? Sit down on the lat pulldown machine and adjust the thigh pad so that it comfortably rests on your thighs. Grasp the wide bar attachment with an overhand grip, hands slightly wider than shoulder-width apart. Sit upright with your chest up and your back straight. Start with your arms fully extended, and your shoulders relaxed. Exhale as you pull the bar down towards your chest by flexing your elbows. Focus on using your lats to pull the bar down and squeeze your shoulder blades together at the bottom of the movement. Hold the contracted position for a second, feeling the tension in your lats. Inhale as you slowly return the bar to the starting position with your arms fully extended. Repeat for the desired number of repetitions. 2.     Pendlay Row Image Source  Pendlay rows are a versatile compound exercise that targets the upper back, lats, and traps. They are particularly effective for building thickness and strength in the middle and upper back. Pendlay rows also engage the core muscles as they require stabilization during the movement, promoting overall core strength and stability. This exercise is excellent for enhancing functional strength, which can have practical benefits in daily life and sports. Equipment Needed: Barbell, weight plates, and a flat bench. How to do it? Place a barbell with the desired amount of weight on the floor in front of you. Stand with your feet hip-width apart, toes pointing forward, and the barbell over the middle of your feet. Bend at your hips and knees to lower your torso until it’s almost parallel to the floor. Maintain a neutral spine. Bend your knees slightly and bend forward at the hips to grasp the barbell with a shoulder-width, overhand grip. Brace your core, keep your chest up, and your back straight. Lift the barbell off the floor by extending your hips and standing up. Pull the barbell towards your lower chest while keeping it close to your body, retracting your shoulder blades. Lower the barbell back to the floor in a controlled manner, touching it between each rep. Perform the desired number of repetitions. 3.     Seated Cable Rows Image Source Seated cable rows are a staple in back training routines, working the lats, rhomboids, and mid-back muscles. The use of a cable machine provides constant tension throughout the range of motion, making it an effective exercise for muscle growth and definition. Furthermore, seated cable rows are amongst the top lat workouts that contribute to better posture, as they strengthen the muscles responsible for scapular retraction and shoulder stability. Equipment Needed: Cable row machine with a V-bar attachment. How to do it? Sit down at the cable row machine, place your feet on the footrests, and adjust the knee pad to fit snugly against your thighs. Grasp the V-bar attachment with both hands using a neutral grip (palms facing each other). Sit up straight with a slight lean forward from your hips and your chest up. Start with your arms fully extended, keeping your shoulders relaxed. Exhale as you pull the V-bar towards your lower ribcage by retracting your shoulder blades and bending your elbows. Squeeze your lats at the fully contracted position. Inhale as you extend your arms, returning the V-bar to the starting position. Repeat for the desired number of repetitions. 4.     Single Arm Dumbbell Rows Image Source Single-arm dumbbell rows are essential for targeting the lats and upper back while also working the biceps. They provide the advantage of isolating each side of the body, helping to address muscle imbalances. This exercise promotes balanced development and enhances overall core strength by engaging the core for stability. Single-arm dumbbell rows are suitable upper lat exercise for both beginners and advanced lifters, as the weight can be adjusted to match individual capabilities. Equipment Needed: Dumbbell and a flat bench. How to do it? Place a dumbbell on the floor next to a flat bench. Stand on the left side of the bench and place your left knee and left hand on the bench for support. Bend your left knee slightly and keep your back straight. Grasp the dumbbell with your right hand using an overhand grip. Keep your right arm fully extended and let it hang straight down. Exhale as you pull the dumbbell towards your hip by bending your elbow and retracting your shoulder blade. Squeeze your lat at the top of the movement. Inhale as you lower the dumbbell back to the starting position. Repeat for the desired number of repetitions on each side. 5.     Dumbbell Pullovers Image Source Dumbbell pullovers are a unique exercise that primarily

Read More »

Unlocking Massive Gains With These 5 Powerful Back Cable Exercises

Picture this: you’re standing tall, ready to conquer the world, and your back is your mighty armor, showcasing strength, confidence, and resilience. But how do you forge this powerful fortress of muscle? Fret not, for the answer lies in the art of cable back exercises. As if harnessed from the gods of strength training, these exercises wield the power to sculpt your back into a masterpiece of functional muscle and aesthetic appeal. In this guide, we are about to present the back cable exercises that will help you chisel your way to a back worth boasting about. Top Back Cable Workouts Let’s take a look at the most recommended back cable exercises that will help you build heavy back: 1.      Seated Cable Row Image Source The Seated Cable Row is an excellent back cable exercise for developing a strong, well-defined back. It primarily targets the middle and lower portions of the latissimus dorsi muscles, along with the rhomboids and trapezius. This exercise enhances back thickness, promotes better posture, and helps prevent imbalances in shoulder development. By engaging the entire back and promoting scapular retraction, it also contributes to improved shoulder health. Step-By-Step Guide Sit down on the rowing machine and place your feet on the platform with your knees slightly bent. Grab the handle attachment with a neutral (palms facing each other) or overhand grip, depending on the machine. Keep your back straight, chest up, and shoulders down and back. Pull the handle towards your lower ribcage by retracting your shoulder blades and squeezing your back muscles. Pause for a moment at the fully contracted position. Slowly return the handle to the starting position, fully extending your arms. 2.      Cable Shrugs Cable Shrugs are a targeted exercise that specifically works the trapezius muscles. This exercise helps build upper back strength and size by isolating the traps. It’s particularly effective for improving the aesthetics of the upper back and creating that sought-after “V” shape. Additionally, Cable Shrugs reduce the risk of injury by allowing for controlled and constant resistance throughout the movement. Step-By-Step Guide Stand in the middle of a cable machine with a D-handle attached to the low pulley. Hold the handle with both hands, palms facing your body. Keep your arms fully extended, and your feet shoulder-width apart. Elevate your shoulders as high as possible while keeping your arms straight. Hold the contracted position for a moment to squeeze your traps. Lower your shoulders back down to the starting position. 3.      Close Grip Lat Pulldown Image Source The Close Grip Lat Pulldown is a versatile exercise that primarily targets the latissimus dorsi but also engages the biceps and other upper back muscles. It helps widen the back, creating a more impressive V-taper and enhancing overall upper body strength. The close grip recruits the biceps more, making it an excellent compound back cable exercise for simultaneously building back and arm strength. Step-By-Step Guide Sit down at a lat pulldown machine and secure your legs under the provided pads. Grab the bar attachment with a grip slightly narrower than shoulder-width apart, palms facing forward. Keep your chest up, shoulders down and back, and a slight arch in your lower back. Pull the bar down towards your upper chest while squeezing your shoulder blades together. Pause at the bottom of the movement, then slowly return the bar to the starting position, fully extending your arms. 4.      Cable Pullover Image Source The Cable Pullover is a unique exercise that targets the lats, chest, and serratus anterior muscles. It’s an effective way to expand the ribcage and develop width in the upper body. This exercise is also beneficial for improving shoulder mobility and flexibility. It’s often used as a finishing exercise in back workouts to ensure thorough muscle engagement and complete development. Step-By-Step Guide Attach a rope or straight bar to the high pulley of a cable machine. Lie on your back on a bench or the floor, perpendicular to the cable machine. Hold the rope or bar with both hands, palms facing down, and arms extended over your chest. Keep a slight bend in your elbows and maintain a neutral spine. Lower the rope or bar in an arc motion over your head while keeping your arms extended. Feel the stretch in your lats and then pull the rope or bar back over your chest to the starting position. 5.     Cable Reverse Fly Image Source Cable Reverse Fly is a fantastic exercise for strengthening the rear deltoids, upper traps, and rhomboid muscles. By targeting the posterior deltoids, it helps balance out shoulder development and improves posture by countering the effects of forward shoulder rotation. This exercise also enhances shoulder stability, which is essential for various upper-body movements. Additionally, the constant tension provided by the cable machine makes it an effective isolation exercise for the rear deltoids and upper back. Step-By-Step Guide Set the pulleys on a cable crossover machine to the lowest position. Stand in the middle of the machine and hold one handle in each hand with your palms facing each other. Step forward slightly and bend your hips and knees slightly to maintain balance. Keep a slight bend in your elbows and a straight back. Open your arms wide, squeezing your shoulder blades together as you do so. Hold the peak contraction for a moment. Slowly return your arms to the starting position without letting the weight stack touch. Over To You So, there you have it – a comprehensive guide to the best back cable exercises that can elevate your back game to Olympian heights. Remember, consistency and proper form are your loyal companions on this journey. Here’s to a back that stands strong, a back that stands out, and a back that speaks volumes about your commitment to fitness.

Read More »

5 Exercises For Apple-Shaped Women To Transform Into Hourglass Figures

Hey there, fabulous apples! 🍎 So, you’re rocking that beautiful apple-shaped figure and want to keep it healthy and happy, right? Well, you’ve landed in the right orchard of fitness advice. We get it; those curves are your pride, and you’re not looking to become a pear or a banana any time soon. Fear not, because we’ve got your back, or should we say, your core? In this juicy blog post, we’re going to spill the beans on the best exercises for apple shaped women. We’ll help you whittle that waistline, boost your confidence, and have you feeling like the apple of everyone’s eye in no time. So grab a water bottle and a sweatband, because it’s time to crunch and squat our way to fitness glory: Best Workouts For Apple Shaped Body Let’s take a look at the best exercises that are tailor-made for apple-shaped women: 1.      Bicycle Crunches Image Source Bicycle crunches effectively target the abdominal muscles, helping to tone and strengthen the core. Engaging the core in this way can aid in reducing abdominal fat, which is a common concern for apple-shaped individuals. Step-By-Step Guide Lie on your back with your hands behind your head, fingers lightly supporting your head. Lift your legs off the ground and bend them at a 90-degree angle. Bring your right elbow and left knee toward each other while straightening your right leg. Simultaneously twist your torso to the right. Repeat on the opposite side, bringing your left elbow and right knee together while straightening your left leg. Continue this pedaling motion, alternating sides, for the desired number of repetitions. Mistakes To Avoid Neck Strain: Don’t pull on your neck with your hands; keep your hands lightly supporting your head, and focus on bringing your shoulder blades off the ground. Jerky Movements: Perform the exercise in a controlled, fluid motion to engage the core effectively and prevent straining the lower back. 2.      Russian Twists Image Source Russian twists are amongst the best exercises for apple-shaped bodies as they work the oblique muscles, helping to create a more defined waistline. Strengthening the obliques can also improve posture and spinal stability, which is important for those with excess weight in the midsection. Step-By-Step Guide Sit on the floor with your knees bent and your feet flat on the ground. Lean back slightly, keeping your back straight and your core engaged. Clasp your hands together in front of you or hold a weight with both hands. Lift your feet off the ground, balancing on your sit bones. Rotate your torso to the right, bringing the weight or your clasped hands toward the ground beside your right hip. Return to the center and then rotate to the left, bringing the weight or your hands beside your left hip. Continue alternating sides for the desired number of repetitions. Mistakes To Avoid Hunching Your Back: Maintain good posture by keeping your back straight and chest up; avoid rounding your back, which can strain your lower back. Using Excessive Weight: Start with a manageable weight to maintain proper form; using too heavy a weight can lead to poor technique. 3.      Dumbbell Row Image Source Dumbbell rows target the upper back and shoulders, helping to balance the overall physique. These compound exercises and workouts for apple shaped women engage multiple muscle groups, aiding in calorie burning and overall fat loss. Step-By-Step Guide Stand with your feet shoulder-width apart, holding a dumbbell in each hand. Bend your knees slightly and hinge at your hips, keeping your back straight. Let the dumbbells hang in front of you, arms fully extended. Pull the dumbbells toward your hips, squeezing your shoulder blades together. Lower the dumbbells back down with control. Repeat for the desired number of repetitions. Mistakes To Avoid Improper Form: Avoid using your lower back to lift the weights; instead, engage your upper back muscles while keeping your core stable. Overarching the Back: Keep your spine neutral; don’t arch or round your back during the exercise. 4.      Donkey Kicks Image Source Donkey kicks focus on the glutes, helping to lift and shape the buttocks, which can balance the body’s proportions. The leg movement involved also contributes to calorie expenditure. Step-By-Step Guide Start on your hands and knees in a tabletop position. Keep your wrists under your shoulders and your knees under your hips. Engage your core and lift your right knee off the ground, keeping it bent at a 90-degree angle. Push your right foot up toward the ceiling, straightening your leg. Lower your leg back to the starting position. Repeat for the desired number of repetitions on one side before switching to the other. Mistakes To Avoid Lifting the Leg Too High: Focus on lifting your leg to hip level, rather than arching your back or kicking too high. Neglecting Core Engagement: Keep your core engaged throughout the movement to support your lower back and maintain stability. 5.      Side Leg Lifts Image Source Side leg lifts target the hips and thighs, helping to tone and firm these areas. Working on the hips and thighs can enhance lower body symmetry, making this a result driven apple shaped body workout. Step-By-Step Guide Lie on your side with your legs straight and stacked on top of each other. Rest your head on your lower arm or use your hand for support. Lift your top leg as high as you can without moving your torso. Lower it back down with control. Repeat for the desired number of repetitions on one side before switching to the other. Mistakes To Avoid Lifting Too High: Lift your leg to a comfortable height; lifting too high can strain your lower back and hip. Using Momentum: Perform the exercise slowly and with control; avoid swinging your leg to prevent injury. Final Verdict Getting in shape and staying healthy isn’t about conforming to some one-size-fits-all ideal. It’s about understanding your unique body and giving it the love and attention it deserves. With these fabulous exercises for apple shaped body in

Read More »

5 Insane Compound Triceps Exercises: A Shortcut To Sculpted Arms

Are you tired of endlessly searching for the perfect triceps exercises to sculpt those killer arms? Well, we’ve got the ultimate triceps workout solution for you. In this blog post, we’re about to discuss compound triceps exercises – the secret sauce to achieving those toned and powerful arms you’ve always dreamed of. We get it; time is precious, and you want workouts that deliver maximum results in minimal time. Compound triceps exercises are here to save the day. These exercises target your triceps and engage multiple muscle groups, giving you a bang for your buck. Let’s try them out: Best At Home Compound Triceps Exercises Listed below are the best compound triceps workouts that are sure to become your new favorite: 1.      Parallel Bar Dips Image Source Parallel bar dips are an exceptional triceps compound exercise that targets the triceps and engages the chest and shoulders. By consistently performing this exercise, individuals can effectively increase triceps strength and size while also improving overall upper body strength. It’s particularly beneficial for enhancing the definition and tone of the triceps muscles. Setup: Find a set of parallel bars or dip bars. Stand between the bars, facing forward. Grip the bars with your palms facing down and your arms fully extended. Execution: Lower your body by bending your elbows until your upper arms are parallel to the ground or slightly below. Keep your torso upright and your chest up. Push yourself back up to the starting position by straightening your arms. Tips: Keep your shoulders down and back to avoid unnecessary stress on them. To increase difficulty, you can add weight using a dipping belt or hold a dumbbell between your feet. 2.      Diamond Push-Ups Image Source Diamond push-ups are a versatile no-equipment compound triceps exercise that isolates the triceps muscles. This exercise can be an excellent addition to a home or gym workout routine for those looking to sculpt and strengthen their triceps without the need for equipment. It’s a valuable exercise for enhancing muscular endurance and promoting well-defined triceps. Setup: Start in a standard push-up position with your hands close together, forming a diamond shape with your thumbs and index fingers. Keep your body in a straight line from head to heels. Execution: Lower your body by bending your elbows while keeping them close to your sides. Lower yourself until your chest is just above the diamond formed by your hands. Push yourself back up to the starting position. Tips: Keep your core engaged and maintain a straight line from head to heels throughout the exercise. If standard diamond push-ups are too challenging, you can start with your knees on the ground and gradually progress to full push-ups. 3.      Close-Grip Bench Press Image Source The close-grip bench press is a classic strength training exercise that focuses on the triceps, making it an indispensable addition to any chest and triceps workout. By using a narrower grip on the barbell, individuals can place greater emphasis on the triceps while still engaging the chest and shoulders. This exercise is particularly advantageous for building raw triceps strength and supporting overall upper-body development. Setup: Lie on a flat bench with your back, shoulders, and hips firmly on the bench. Grip the barbell with your hands closer than shoulder-width apart, palms facing forward. Lift the barbell off the rack and position it over your chest with your arms fully extended. Execution: Lower the barbell by bending your elbows while keeping them close to your body. Lower the barbell until it touches your chest. Push the barbell back up to the starting position, fully extending your arms. Tips: Maintain a tight grip on the barbell and keep your wrists straight. Use a spotter when lifting heavy weights to ensure safety. 4.      Dumbbell Tate Press Image Source The Tate press is a highly targeted compound triceps exercise with dumbbells that isolate the triceps brachii. This movement allows individuals to focus on the full extension of the triceps while minimizing involvement from other muscle groups. As a result, it is effective in sculpting well-rounded, strong triceps and can be instrumental in achieving a balanced upper body appearance. Setup: Lie on a flat bench with a dumbbell in each hand. Extend your arms over your chest, palms facing each other. Execution: Bend your elbows and lower the dumbbells to the sides of your chest. Keep your elbows bent and close to your sides throughout the movement. Extend your arms, pushing the dumbbells back up to the starting position. Tips: Maintain control throughout the exercise and avoid swinging the weights. Start with a light weight to ensure proper form before increasing resistance. 5.      Elevated Pike Push-Up Image Source The elevated pike push-up is an effective bodyweight exercise that primarily challenges the triceps, shoulders, and upper chest. By incorporating this exercise into their routine, individuals can enhance triceps endurance and develop shoulder strength. Moreover, it improves core stability and balance, making it a valuable addition to any calisthenics or bodyweight training regimen. Setup: Assume a push-up position with your feet elevated on a stable surface, such as a bench or step. Walk your hands closer to your feet, forming a pike position with your hips raised. Execution: Lower your body by bending your elbows. Lower yourself until your head is just above the ground or floor. Push yourself back up to the starting position. Tips: Maintain a strong core and engage your glutes to keep your body in a straight line. If the exercise is too challenging, you can perform it with your feet on the ground instead of elevated. Final Words No more wasting time with endless sets of isolation exercises when you can get more done with fewer moves. Compound triceps exercises save you time and deliver better overall results by engaging multiple muscle groups simultaneously.

Read More »
compound resistance band exercises

Looping Your Way To Fitness: 5 Best Compound Resistance Band Exercises

Are you tired of the same old gym routine? Looking to spice up your workouts without breaking the bank on fancy equipment? Well, you’re in for a treat because today, we’re about to discuss some of the best compound resistance band exercises. Forget about bulky machines and pricey gym memberships – these versatile bands are about to become your new best workout buddies. We’re about to show you how to turn those colorful bands into your secret weapon for a full-body, muscle-sculpting, calorie-burning extravaganza. It’s time to stretch, flex, and have a ton of fun while you’re at it! Let’s get started! 🚀 Best Compound Resistance Band Exercises Let’s take a look at the top compound resistance band workouts that will up your fitness game: 1.      Resistance Band Floor Press Image Source The Resistance Band Floor Press primarily targets the chest, triceps, and shoulders. This resistance band compound exercise is highly effective for building upper body strength and muscle definition. It also engages the stabilizer muscles as you work to control the resistance band’s tension throughout the movement. Additionally, resistance bands allow for a full range of motion, helping to improve muscle engagement and flexibility in the shoulders and chest. Muscles Targeted: Chest, Triceps, Shoulders Equipment Needed: Resistance band, sturdy anchor point Step-by-Step Guide Setup: Attach one end of the resistance band to a sturdy anchor point (e.g., a pole, door frame, or wall) at chest height. Lie on your back with your knees bent and your feet flat on the floor. Band Placement: Hold the other end of the resistance band in each hand, making sure it’s even on both sides. Your hands should be slightly wider than shoulder-width apart. Press: With your elbows bent and your palms facing away from you, press the band upward until your arms are fully extended. Squeeze your chest muscles at the top of the movement. Lower: Slowly lower the band back to the starting position, keeping your elbows at about a 90-degree angle. Repetitions: Perform the desired number of repetitions, maintaining control throughout the movement. 2.      Single-Leg Banded Deadlift Image Source The Single-Leg Banded Deadlift is an excellent exercise for targeting the hamstrings, glutes, and lower back while also enhancing balance and stability. By isolating one leg at a time, it helps to address muscular imbalances that can occur in the lower body. The resistance band adds resistance throughout the entire range of motion, making this exercise particularly effective for strengthening the posterior chain and improving hip mobility. It’s a valuable addition to any lower body workout routine and can help prevent injuries related to weak glutes and hamstrings. Muscles Targeted: Hamstrings, Glutes, Lower Back Equipment Needed: Resistance band Step-by-Step Guide Setup: Stand on the center of the resistance band with your feet hip-width apart. Hold the band’s handles in each hand. Single Leg: Shift your weight to one leg while keeping a slight bend in the knee of your non-weight-bearing leg. This is your starting position. Hinge Forward: Keeping your back straight, hinge at your hips and lower your torso toward the ground. As you do this, extend your non-weight-bearing leg behind you for balance. Stretch: Feel the stretch in your hamstrings and maintain a straight back throughout the movement. Return: Push through your heel and return to an upright position while squeezing your glutes at the top. Repetitions: Perform the desired number of repetitions on one leg before switching to the other. 3.      Resistance Band Push-Ups Image Source Resistance Band Push-ups are a dynamic variation of the classic push-up, adding an extra challenge to your chest, shoulders, triceps, and core. These exercises intensify the effort required in both the push-up and the push-up return phases due to the band’s resistance. As a result, they promote greater muscle activation and development in the upper body. By adjusting the band’s tension, you can easily customize the difficulty level, making it a suitable compound resistance band workout for various fitness levels. Incorporating resistance bands into push-ups can help individuals progress toward performing more traditional push-ups with perfect form. Muscles Targeted: Chest, Shoulders, Triceps, Core Equipment Needed: Resistance band Step-by-Step Guide Setup: Place the resistance band around your back, just below your shoulder blades. Hold one end of the band in each hand, and get into a push-up position with your hands shoulder-width apart. Push-up: Lower your chest toward the ground while keeping your body in a straight line. The resistance band provides added tension as you push up. Push-up Variation: You can vary the resistance by adjusting the placement of the band on your back or using a thicker band. Repetitions: Perform the desired number of push-ups while maintaining proper form. 4.      Banded Side Plank Pull Image Source The Banded Side Plank Pull is an outstanding exercise for strengthening the obliques, shoulders, and core. By incorporating a resistance band, it adds a unique challenge to the side plank position, making it more effective for building stability and muscle endurance in the core and shoulders. This exercise is particularly beneficial for athletes involved in rotational sports or anyone looking to improve core strength and posture. It also enhances shoulder mobility and can aid in preventing lower back pain by reinforcing the muscles responsible for lateral stability. Muscles Targeted: Obliques, Shoulders, Core Equipment Needed: Resistance band Step-by-Step Guide Setup: Lie on your side and loop the resistance band around your top foot. The band should be anchored on the bottom foot, and you should be in a side plank position with your elbow directly beneath your shoulder. Side Plank: Lift your hips off the ground, keeping your body in a straight line. Pull: Reach your free arm over your head and grab the band. Pull the band down toward your hip while keeping your core engaged and your body in a straight line. Return: Slowly release the band and return to the starting side plank position. Repetitions: Perform the desired number of repetitions on one side before switching to the other. 5.      Banded X

Read More »

Quick & Effective: 5 Chest Warm-Up Stretches You Shouldn’t Skip

Are you tired of your workouts feeling like a chilly morning jog through a snowstorm? Well, you’re in for a treat because today, we’re going to thaw out those icy chests and get you prepped for a fiery workout session. We’ve all been there – the struggle of attempting to lift weights or nail that push-up when your chest feels tighter than a clamshell. But fear not, my friends, because we’ve got a solution that’s hotter than a jalapeño on a summer day. In this blog post, we’re going to present some of the top-notch chest warm-up stretches. These stretches aren’t just your run-of-the-mill “touch your toes” routines; we’re talking about the kind of stretches that’ll make your chest muscles feel like they just got a front-row seat at a rock concert – pumped up and ready to rock and roll. Let’s fire up those chest muscles and get ready to conquer your workouts like a true fitness champ: Best Chest Warm Up Stretches At Home Let’s take a look at some of the warm up stretches and exercises for chest: 1.     Child’s Pose Image Source  Child’s Pose is a gentle stretch that offers several benefits for the chest. When you sink your chest toward the floor and extend your arms forward, this pose helps open up the front and shoulders. It’s particularly effective at relieving tension and tightness in the pectoral muscles, which can be especially beneficial if you spend long hours at a desk or in front of a computer. Child’s Pose also promotes relaxation and deep breathing, allowing you to release stress and improve your overall posture. Step-By-Step Guide Start by kneeling on the floor with your big toes touching and knees spread apart. This is your starting position. Sit back on your heels, ensuring that your toes remain touching and your knees are comfortably spread. Reach your arms forward on the floor, extending them as far as you can. Lower your chest and forehead toward the ground while keeping your arms extended. Allow your forehead to rest on the floor and relax your neck completely. Keep your hips pressed back towards your heels. Hold this stretch for 20-30 seconds or longer, focusing on deep, rhythmic breathing. Feel the gentle stretch in your lower back, shoulders, and arms. To release, gently walk your hands back towards your body, lifting your upper body, and return to a kneeling position. 2.     Thread the Needle Stretch Image Source  Thread the Needle Stretch targets the chest and shoulders with precision. As you thread one arm under the other while in a tabletop position, you stretch and release tension in the upper chest and shoulder area. This chest warm up stretch can be particularly helpful for individuals who experience tightness in their chest due to activities like weightlifting or carrying heavy loads. It provides relief and greater flexibility in the chest muscles, promoting a better range of motion in the shoulders. Step-By-Step Guide Begin on your hands and knees in a tabletop position, with your wrists under your shoulders and knees under your hips. Inhale and reach your right arm up toward the ceiling, opening your chest to the right. Exhale and thread your right arm under your left arm, lowering your right shoulder and cheek to the floor. Keep your left hand on the ground for support and gently slide it forward. Feel the stretch in your right shoulder and upper back. Hold the stretch for 20-30 seconds, allowing your body to relax into it. To release, slowly unwind by lifting your right arm back up to the ceiling, then placing it back on the ground. Repeat the stretch on the opposite side. 3.     Shoulder Blade Squeeze The Shoulder Blade Squeeze is less of a stretch and more of an isometric exercise for chest muscles. By actively squeezing your shoulder blades together, you engage the muscles of the upper back and open up the chest. This movement promotes better posture and can alleviate the effects of slouching or sitting hunched over a computer. It also strengthens the muscles that support the chest and shoulders, reducing the risk of developing poor posture-related issues. Step-By-Step Guide Stand up straight with your feet shoulder-width apart, and let your arms hang naturally by your sides. Take a deep breath in, expanding your chest. As you exhale, gently draw your shoulder blades together. Imagine trying to pinch a pencil between your shoulder blades. Hold the squeeze for 5-10 seconds, maintaining good posture with your shoulders down away from your ears. Release the squeeze while inhaling. Repeat this stretch 5-10 times. 4.     Doorway Stretch Image Source The Doorway Stretch is a targeted stretch for the chest and front shoulder muscles. By pressing your forearms against a door frame and leaning forward slightly, you create a deep stretch in the chest area. This is especially helpful for individuals who may have tightness in the chest due to activities like weightlifting or excessive sitting. Regularly practicing the Doorway Stretch can increase chest flexibility and reduce the risk of developing rounded shoulders. Step-By-Step Guide Stand in a doorway with your feet shoulder-width apart. Raise your arms to shoulder level and bend your elbows at 90-degree angles. Place your forearms and palms on the door frame, one on each side. Step one foot forward, leaning into the doorway, allowing your chest to open up. You should feel a deep stretch in the front of your shoulders and chest. Hold the stretch for 20-30 seconds, maintaining a slight lean forward. Focus on your breathing; inhale deeply and exhale fully. Step back to release, and repeat the stretch several times, gradually moving your arms higher on the door frame for different angles of stretch. 5.     Cat-Cow Stretch Image Source  Cat-Cow Stretch is a dynamic yoga sequence that benefits the chest in a different way. In the Cow Pose, the chest is expanded, and the shoulder blades draw together, promoting openness in the chest and improved posture. In contrast, the Cat Pose rounds

Read More »

Booty Boot Camp: 5 Cheeky Butt Exercises For Men To Build A Stronger Rearview

We’re about to discuss a topic that often gets overshadowed in the world of fitness: butt exercises for men. Sure, we’ve all seen those impressive biceps and chiseled chests gracing the covers of fitness magazines, but let’s not forget about the powerhouse that is your posterior. Whether you’re looking to enhance your athletic performance, rock those fitted jeans, or simply have a stronger backside, we’ve got your back… well, your butt, to be precise. In this no-nonsense guide, we’ll present the best butt exercises for men that sculpt those glutes and provide a slew of functional benefits. So, grab your workout gear and get ready to give your backside the attention it deserves. But remember, the road to a killer booty is paved with sweat, determination, and yes, a dash of humor. So, let’s get cheeky: How To Improve Buttocks For Male At Home? Listed below are the best glute workouts for men: 1.     Glute Bridges Image Source Glute bridges are the unsung heroes of butt workouts. By targeting your gluteus maximus and hamstrings, they not only help sculpt a rounder, firmer butt but also provide functional benefits. Strong glutes can enhance your athletic performance, improving your speed and power in activities like running and jumping. Additionally, they play a crucial role in stabilizing your pelvis and lower back, reducing the risk of lower back pain and injury. How To Do It? Lie flat on your back with your knees bent at a 90-degree angle and your feet hip-width apart. Ensure that your feet are flat on the ground. Place your arms by your sides, palms facing down, and your fingertips lightly touching your heels. Take a deep breath in and exhale as you engage your core muscles. Push through your heels to lift your hips off the ground while keeping your upper back and shoulders on the floor. Continue lifting until your body forms a straight line from your shoulders to your knees, with your knees and hips in alignment. At the top of the movement, make sure to squeeze your glutes tightly to maximize the contraction. Hold the bridge position for a moment, feeling the tension in your glutes. Slowly lower your hips back down to the ground, one vertebra at a time, while maintaining control. Complete the desired number of repetitions, aiming for 3 sets of 12-15 reps. 2.     Romanian Deadlifts Image Source  Romanian deadlifts are a powerhouse butt exercise for men that will produce results for your posterior chain, including your glutes, hamstrings, and lower back. They help shape your butt, improve your posture, and reduce the risk of back pain. These deadlifts enhance your hip hinge movement pattern, essential for lifting heavy objects and maintaining a strong, functional core. Strengthening your lower back and hamstrings can also lead to improved balance and stability, making everyday movements feel more effortless. How To Do It? Stand with your feet hip-width apart and your toes pointing forward. Hold a barbell or dumbbells in front of your thighs with an overhand grip, hands shoulder-width apart. Keep your knees slightly bent, maintaining a natural arch in your lower back. Initiate the movement by pushing your hips back while keeping your chest up and your back straight. Lower the weights along the front of your thighs, maintaining a slight bend in your knees throughout the movement. Continue lowering the weights until you feel a stretch in your hamstrings, or your back starts to round. Your back should remain flat throughout. Once you’ve reached the bottom of the movement, reverse it by driving your hips forward and standing back up. Squeeze your glutes at the top of the movement to fully engage them. Aim for 3 sets of 8-10 reps with proper form. 3.     Step-Ups Image Source Step-ups are not just about building an impressive butt; they also boost your lower body’s overall strength and stability. This men glute at-home exercise engages your glutes, quadriceps, and calves while challenging your balance and coordination. Beyond aesthetics, step-ups can enhance your functional fitness, making activities like climbing stairs or hiking more manageable. They also target each leg independently, helping to correct any muscle imbalances and reducing the risk of injuries related to strength disparities between your legs. How To Do It? Find a sturdy bench or platform that is knee-high. Stand in front of it with your feet hip-width apart. You can choose to hold dumbbells at your sides for added resistance. Step onto the bench with one foot, ensuring that your entire foot is on the platform. As you step up, push through your heel to lift your body up. Bring your other foot up to join the first one, fully extending your knee. Stand straight at the top of the step, with both feet on the bench. Step back down with one foot at a time, returning to the starting position. Alternate legs for each repetition. Aim for 3 sets of 10-12 reps per leg. 4.     Donkey Kicks Image Source Donkey kicks are the secret sauce for isolating your glutes and building that coveted roundness. They’re fantastic for targeting the gluteus maximus, and their range of motion allows for a deep contraction in each repetition. Plus, these kicks improve your hip mobility and flexibility, making them a valuable addition to your lower body routine. How To Do It? Start on all fours, with your hands directly under your shoulders and your knees under your hips. Ensure your wrists, elbows, and shoulders are aligned, and your knees, hips, and ankles are in line as well. Keep your knee bent at a 90-degree angle and flex your foot on one leg. Lift one leg up, keeping it bent, until your thigh is parallel to the ground. Focus on squeezing your glutes at the top of the movement. Lower your leg back down without touching the ground to maintain tension in your glutes and hamstrings. Repeat the lift for the desired number of reps. Complete the set on one leg before switching to the

Read More »
Scroll to Top